Inventories and products in Bind ERP
A guide for inventory management in Bind ERP: create products, services, and kits. Learn to perform stock adjustments, transfers, cycle counts, and manage lots/serials for complete control.
Module 3: Inventory and Products (The Heart of the Business)
The goal is to have total control over the stock.
Creating Products vs. Services: Differences and When to Use Each.
Products and services are essential elements for correctly managing purchase and sale operations. However, each has a distinct purpose and is used in specific scenarios, so it is important to know their differences to register them properly and maintain efficient control of inventory and billing.
A product is any physical good that is part of your company's inventory. When you register a product, it is directly linked to the inventory module, which allows for detailed tracking of stock, movements, costs, and warehouse entries or exits. Products are created from the Purchases > Products module and are ideal for tangible items such as clothing, electronics, supplies, food, etc..
On the other hand, a service represents an activity offered by the company that does not involve a physical good, therefore it does not affect the inventory. Services are configured from Sales > Sales Concepts, and are designed to record activities such as consulting, maintenance, design, training, or other professional services. Although they are not managed as stock, it is possible to assign them prices, taxes, accounting accounts, and other relevant attributes.
Knowing when to use each will depend on the type of operation being performed. If it involves the sale of physical items, the correct thing to do is to create products. If it is an activity that does not generate movement in the warehouse, the services option should be used. This distinction also allows for clearer accounting and more accurate reports in daily operations.
Below, we will see how to register both a product and a service within Bind ERP, step by step and from the corresponding modules.
Add Product
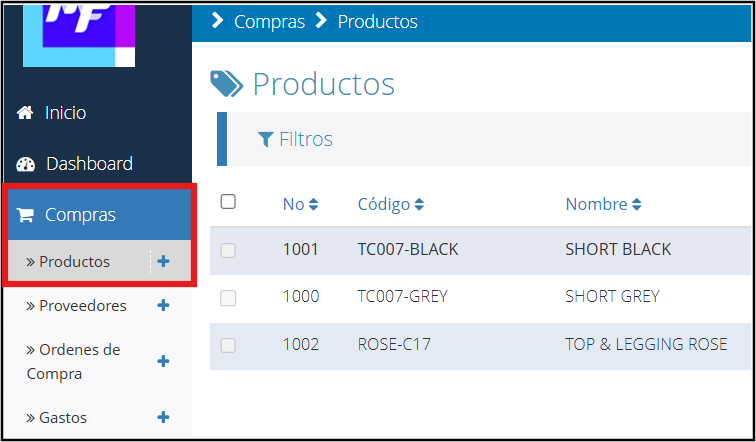
On the main screen, locate the “Purchases” module and then “Products”.
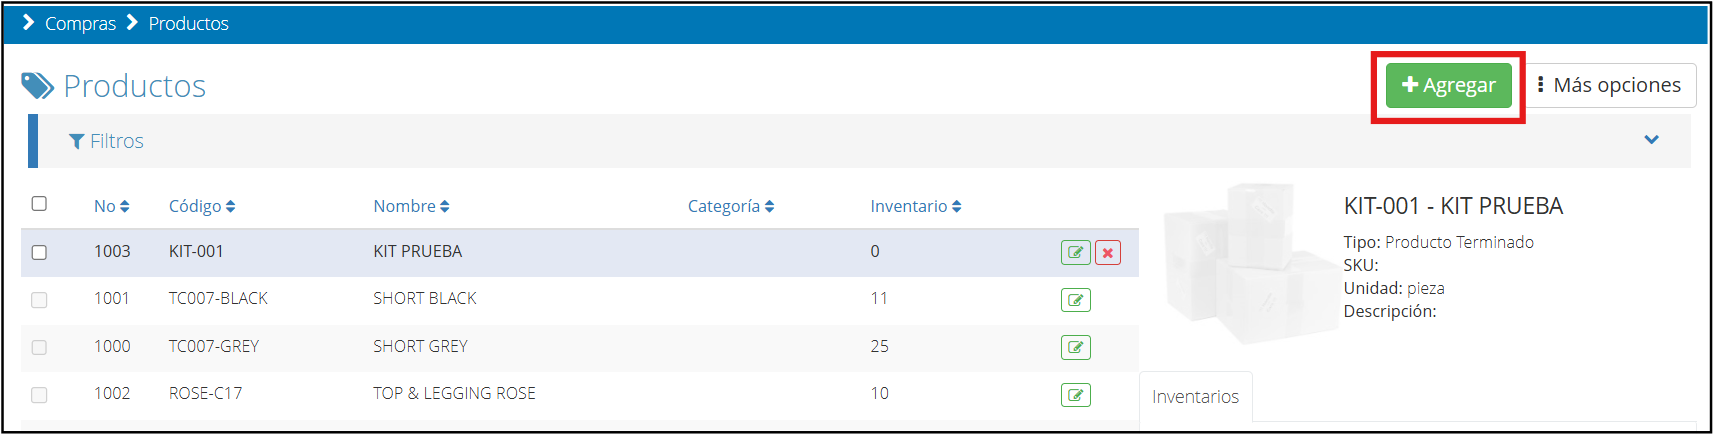
Once inside the products section, you must click on the “Add” button.
Once you click on the add option, a new window will open with different tabs where you must add the corresponding information.
Detail
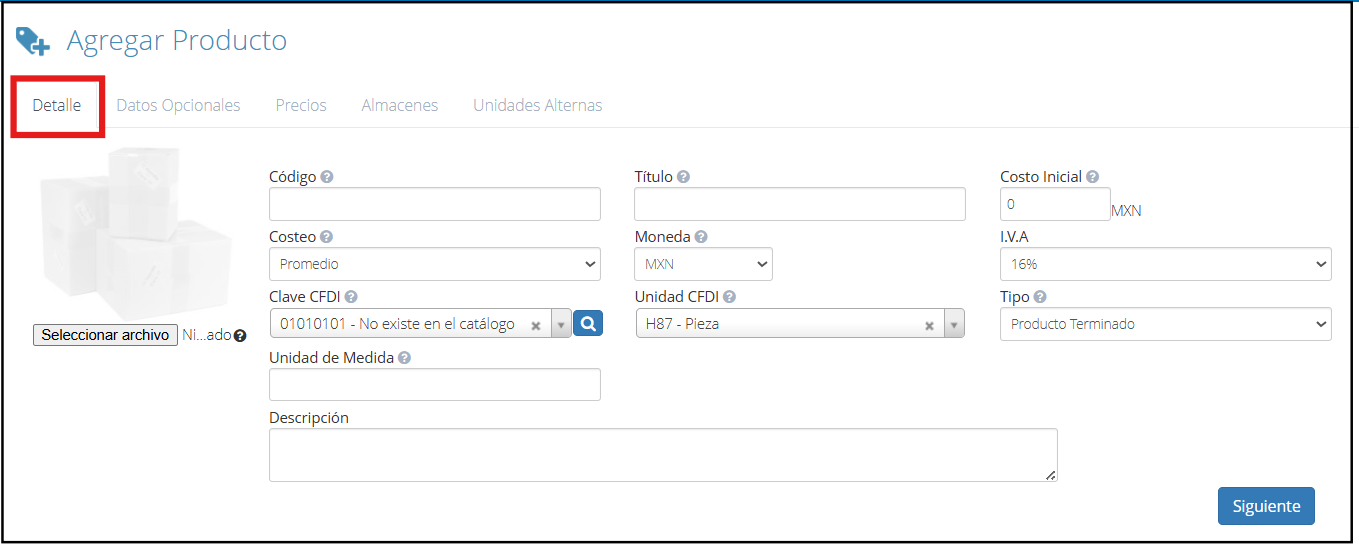
To start, select an image (JPG or PNG format) that represents the product.
Code: This is the internal alphanumeric identifier of the product.
Title: Commercial name of the product.
Initial Cost: Defines how the cost in inventory will be calculated.
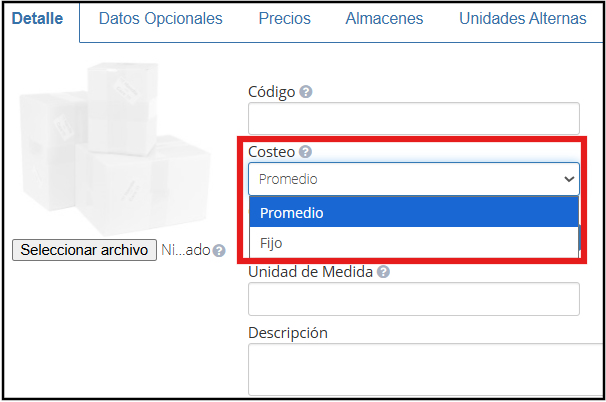
Costing:
Average: The system adjusts the cost each time the product is purchased, using a weighted average.
Fixed: The cost remains the same, regardless of new purchases.
Currency: Choose the main sales currency, even if the purchase is made in another.
VAT: Select the corresponding tax percentage.
CFDI Key and CFDI Unit: Tax data according to the SAT catalog.
Type: Indicates if it is a finished product, raw material, or both.
Unit of Measure: Defines how the product is accounted for (piece, box, etc.).
Optionally, you can add a general description at the bottom.
Once the information is complete, click “Next”.
Optional Data
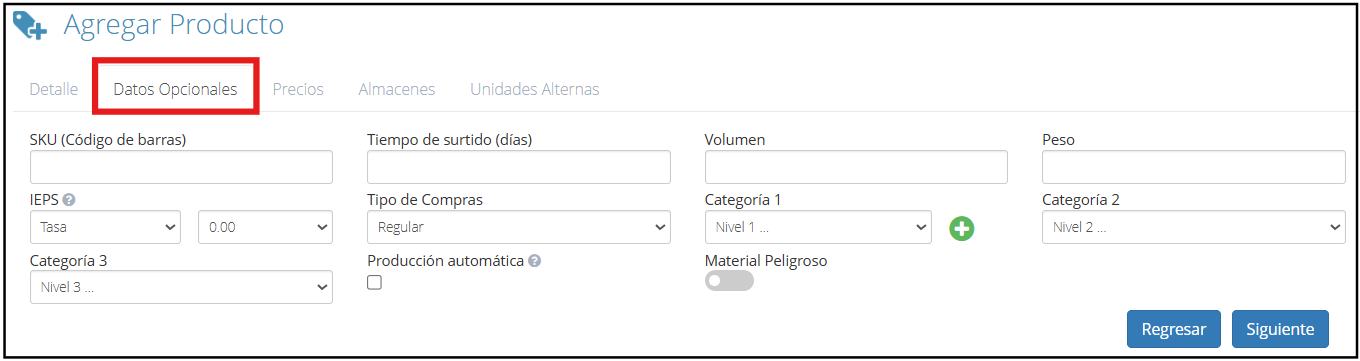
In optional data, you can add complementary information.
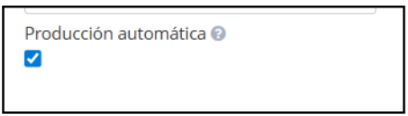
SKU: Barcode Lead Time: In how many days the product is restocked Volume and Weight: Record physical measurements if necessary IEPS: Activate this option if the product is subject to this special tax Purchase Type: Indicates if it is acquired regularly, by lot, or by import document. Categories: Assign categories to organize the product Automatic Production: Allows creating the product automatically using formulas Hazardous Material: Check this box if the product requires it
Once the information is complete, click “Next”.
Prices
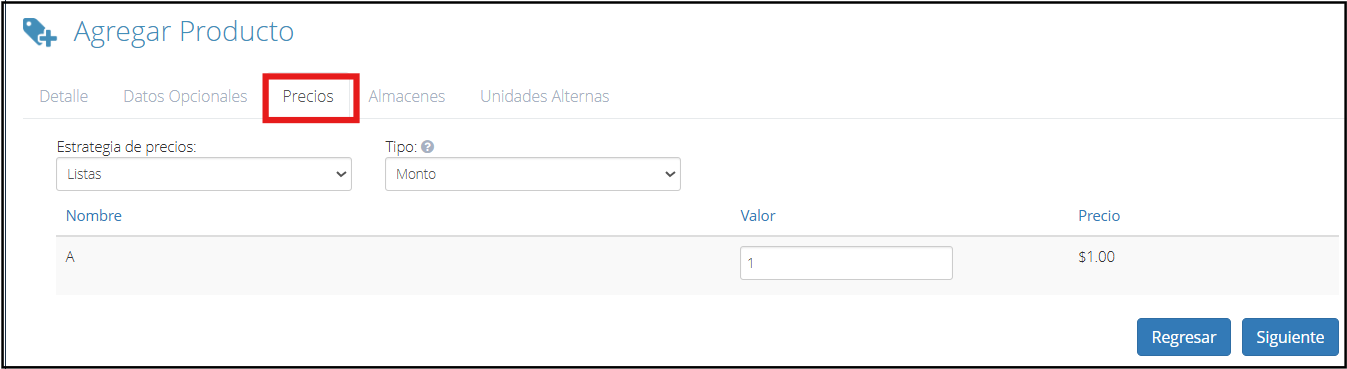
In this tab, you can define how the product's price will be established.
By default, the system uses the lists strategy, but you can also opt for the volume strategy.
In the “Type” field, you can choose if the price will be determined by Amount, Margin, or Mark Up, according to your needs.
Once the prices are selected, click “Next”.
Warehouses
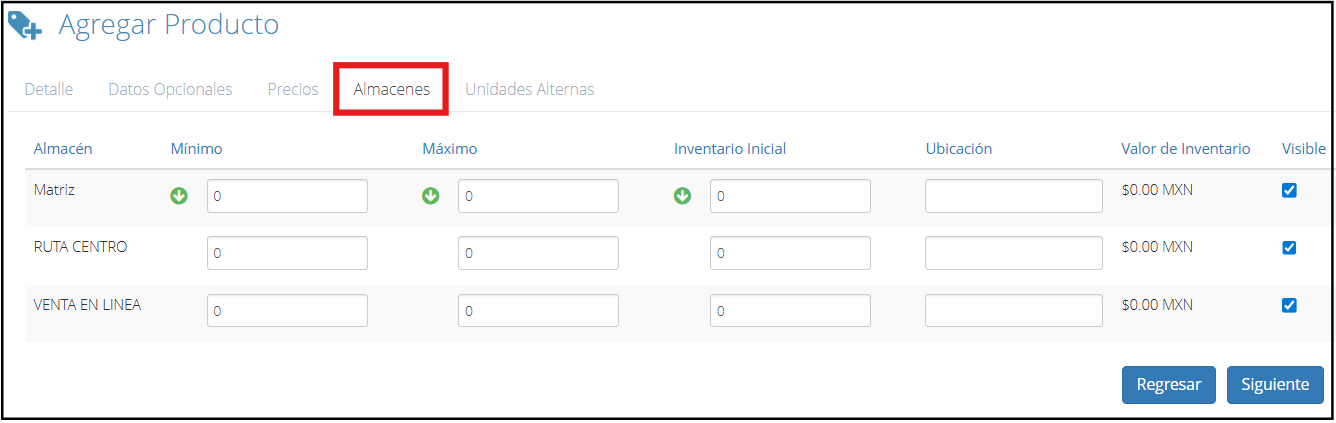
In this section, you must select the product's inventory, its minimums and maximums, as well as its location within the warehouse.
When finished, click “Next”.
Alternate Units
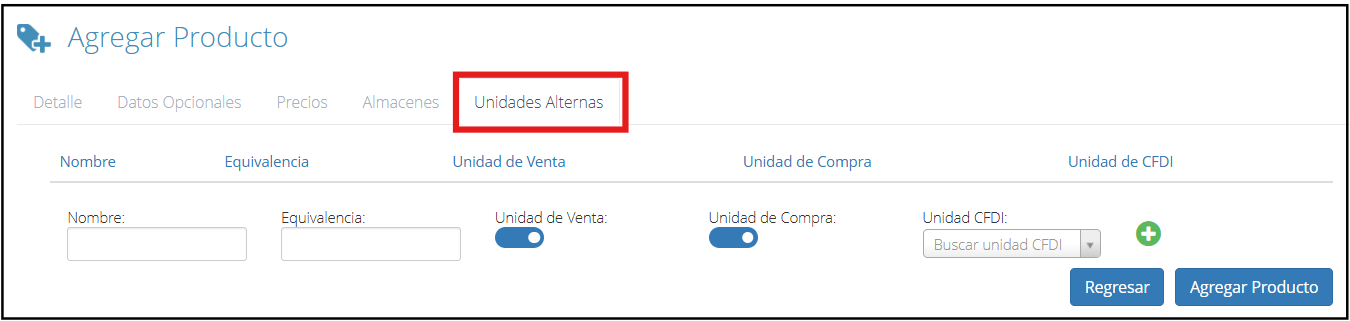
This option allows assigning multiple units of measure to a product, so you can choose the most appropriate one when buying or selling.
When finished, click “Add Product” and it will be saved in the system.
Add Services (Sales Concepts)
On the main screen, locate the “Sales” module and then “Sales Concepts”.
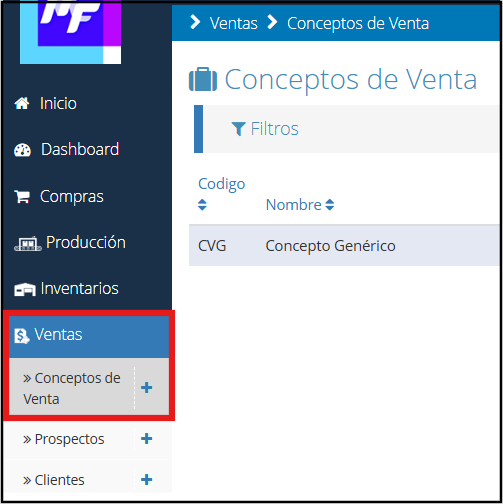
Once inside the sales concepts section, you must click on the “Add” button.
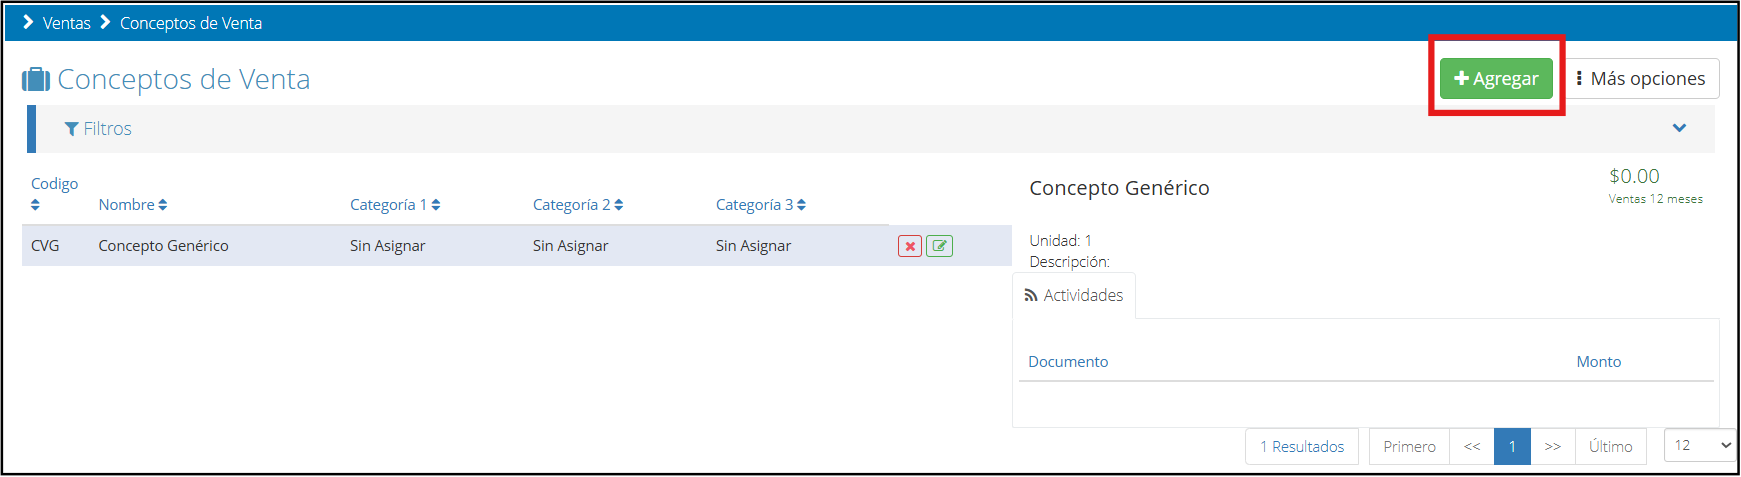
Clicking it will show you the following screen.
Detail
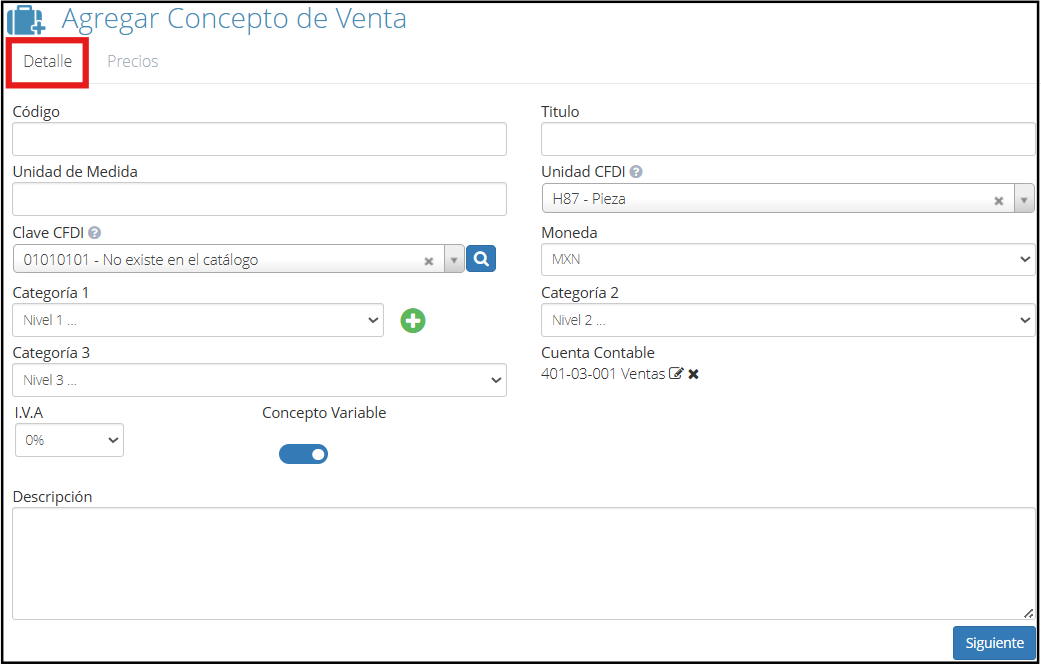
In this tab, it is necessary to complete or choose each of the available fields with the corresponding information.
Code: Assign the code according to your company's coding system Title: Name of the service as it appears in the system Unit of Measure: Record how the service will be measured CFDI Unit: Select the unit according to the official SAT catalog CFDI Key: Enter the fiscal key that corresponds to the service, according to the SAT catalog Currency: Choose the currency in which the service's transactions will be recorded Category: Associate the service with a category VAT: Indicate the VAT percentage that applies to this service Accounting Account: Select the accounting account related to this sales concept Variable Concept: If activated, the service name can be edited at the time of invoicing Description: Additional field to add extra details about the service
When finished, click “Next”.
Prices
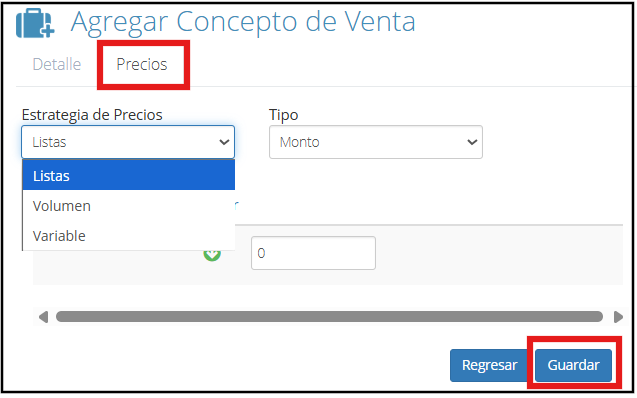
In the prices tab, you must define how the service's price will be established. You have three options:
Price by List: Uses a price previously defined in a price list Price by Volume: Allows assigning different prices according to the quantity acquired Variable Price: The price is defined manually at the time of sale
Once you choose the appropriate option and complete the required information, click “Save” to finish creating the sales concept (service).
Managing Products with Variants: Configuring products with attributes like size, color, etc.
In Bind ERP, it is possible to configure products with variants to facilitate the management of items that share main characteristics but vary in attributes such as size, color, model, or others. This functionality allows you to maintain a more organized and precise control of inventory without the need to create an individual product for each combination.
Add Variant
Access the “Purchases” module from the main screen and choose the “Products” option.
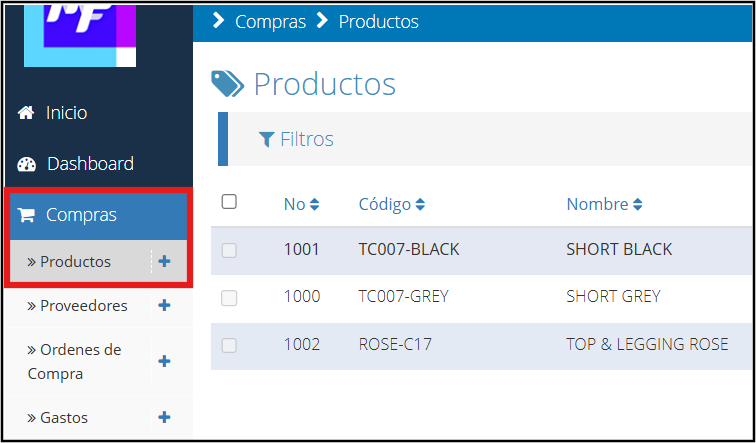
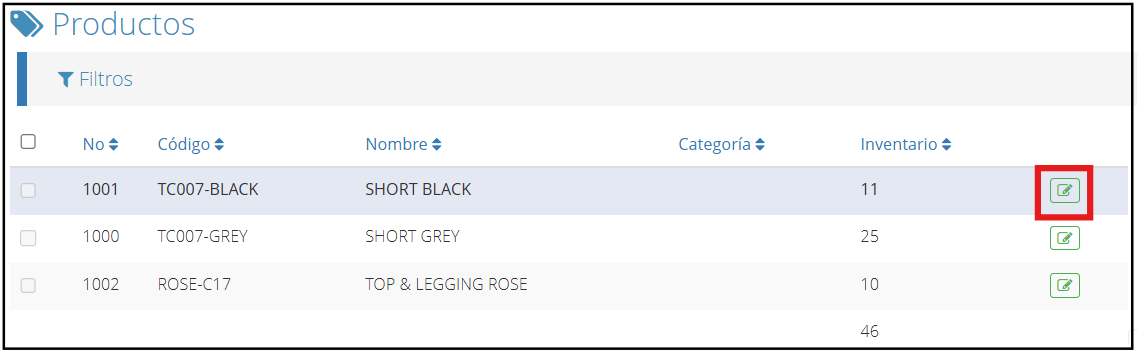
Within this section, identify the product to which you want to add the variant and click on the green icon.
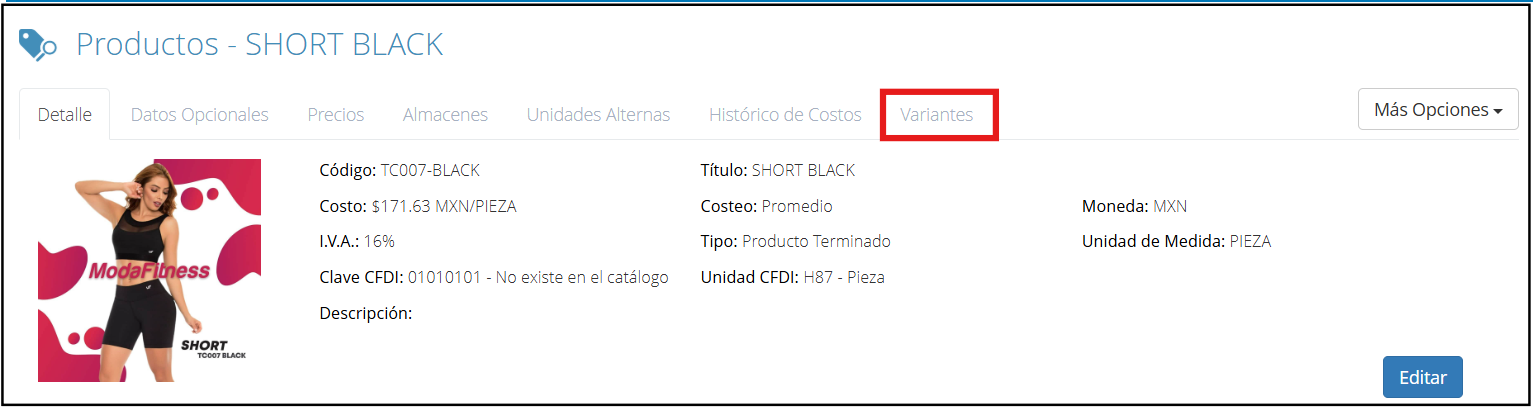
Clicking it will show you the following window with seven tabs; choose the “Variants” option.
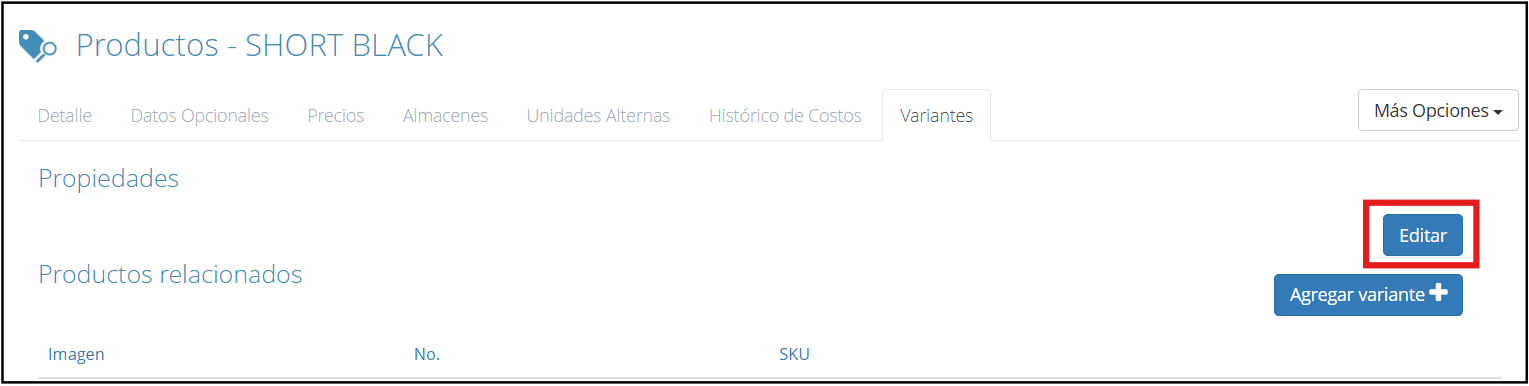
Within the variants option, click on “Edit”. There it will give you the option to modify or add properties to the product to which the variant is being added.
In the top row, you should write the names of the properties you want to add to the product, and in the row below, enter the corresponding values. An example is shown below:
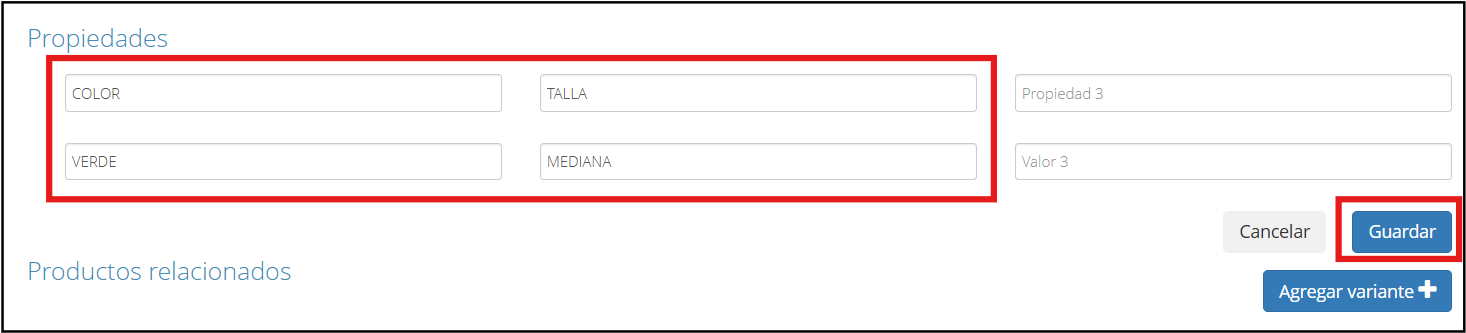
Once the properties are placed, click “Save”.
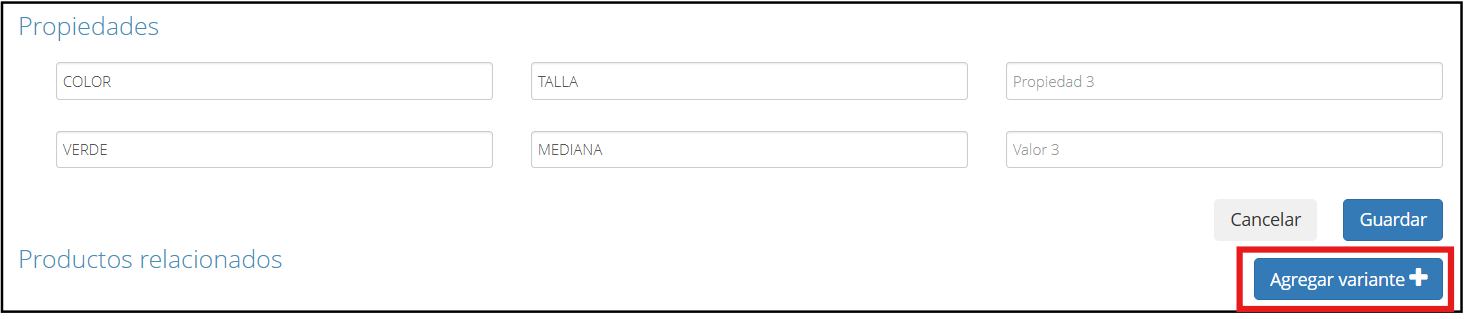
Now proceed to include the related variants. To do this, click “Add variant”.
After clicking, a window will be displayed where you can enter information such as general details, prices, warehouses, and you will even have the option to upload a new image or keep the existing one.
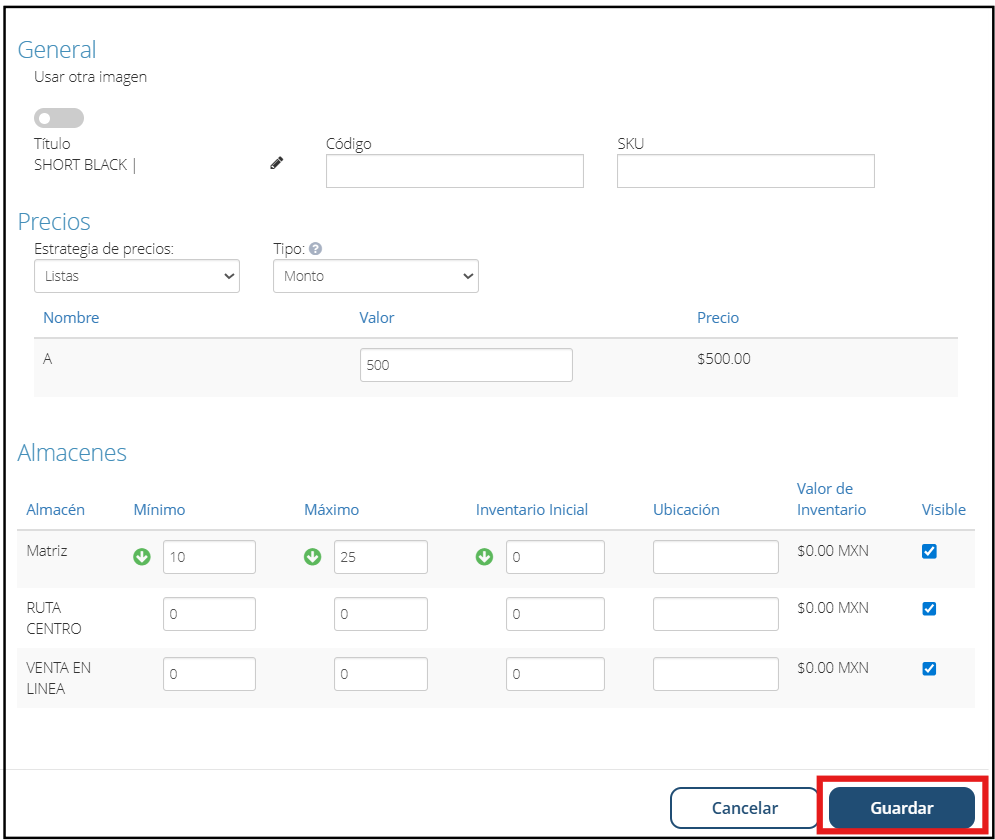
Once the corresponding fields are filled out, click “Save” and the variant will be added.
Kits or Product Bundles: How to group several products into a single SKU for sale.
A kit or product bundle is a grouping of several individual items (products) that are sold as a single unit or SKU. This is useful when you offer combos, promotions, or products that, although composed of several pieces, are marketed together.
First, make sure you have loaded all the products in the kit.
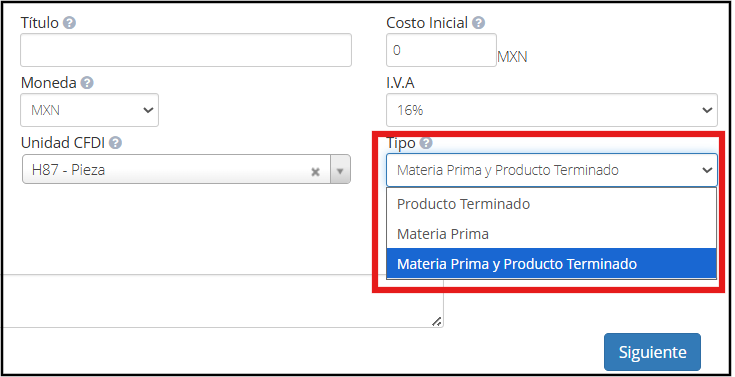
Before creating your kit, it is important that all the products that comprise it are registered in the system. When adding the product, in the “Type” option, select the raw material and finished product option.
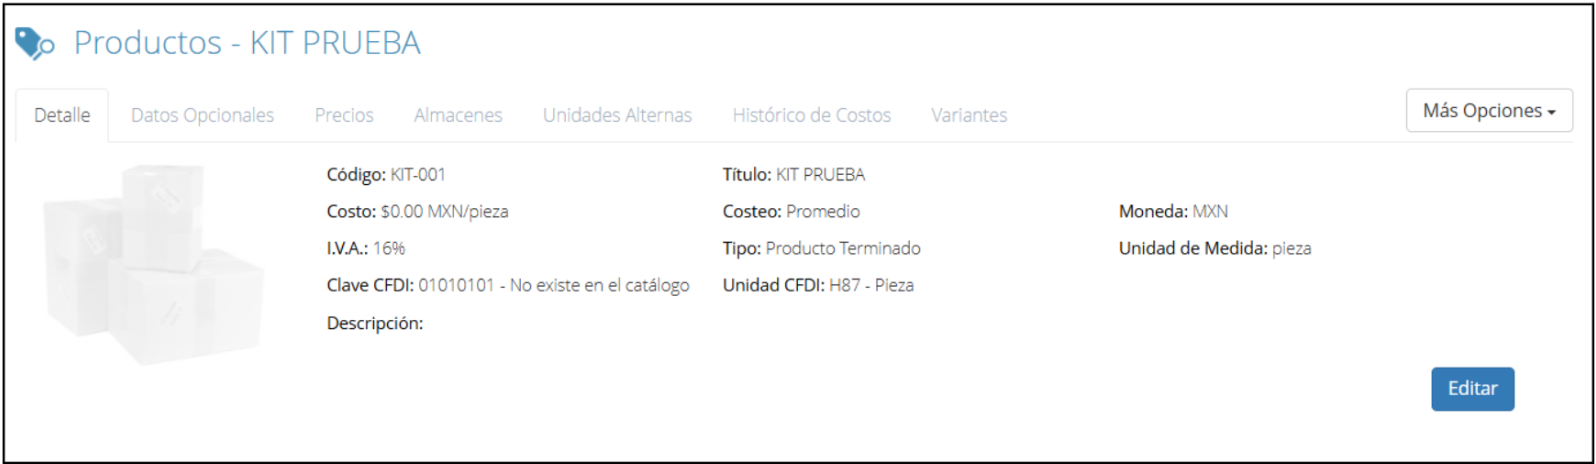
Another important step in the process is to create the kit as if it were just another product in the system. This means you will need to go to the products module, register a new product, and assign it general information such as name, code, unit of measure, category, among others. During this creation, it is essential that you access the Optional Data tab and check the “Automatic Production” box.
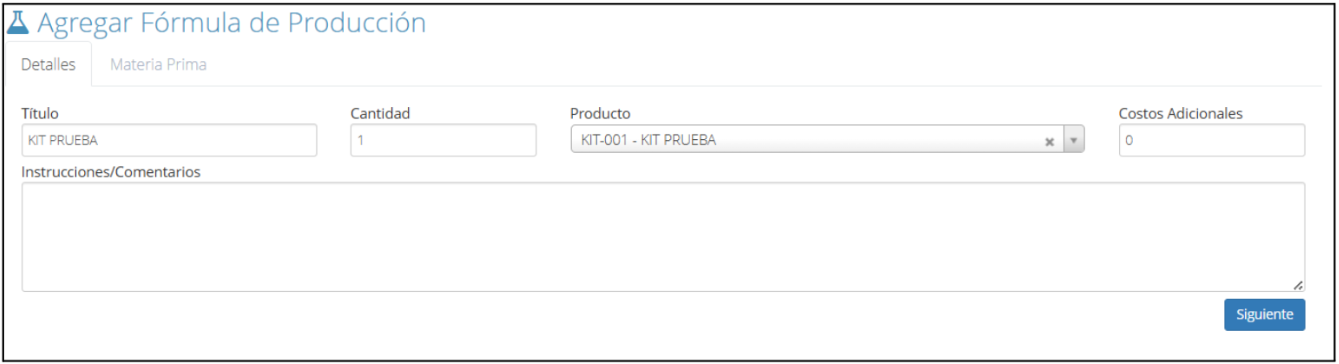
Once you have added all the products that will be part of the kit, you must proceed with creating the corresponding production formula; in this case, the name of the formula is the same as the product (Kit).
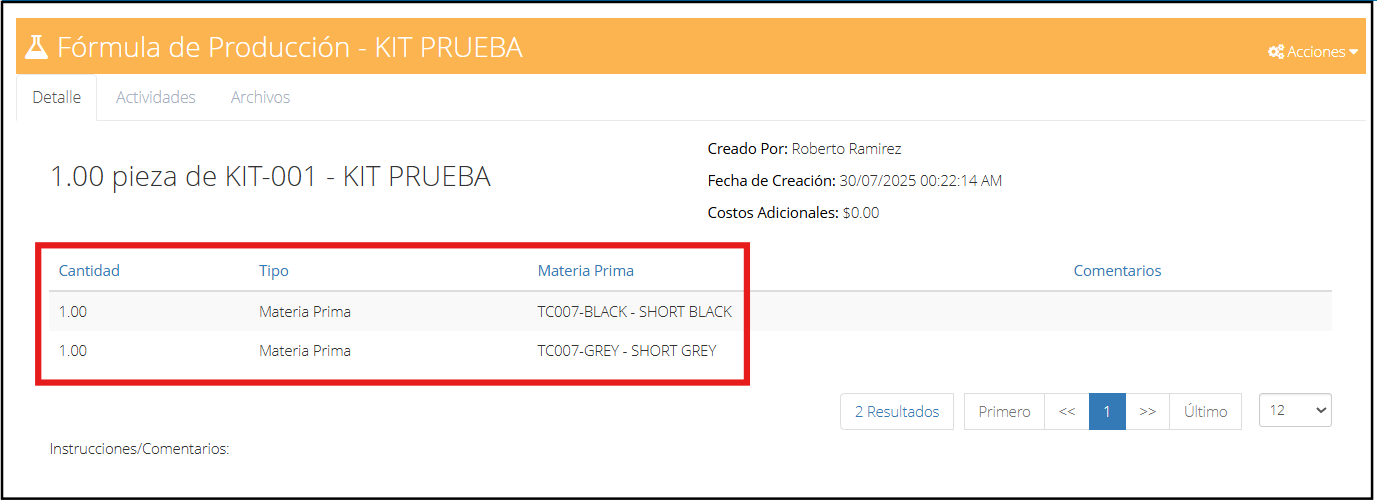
Once the production formula is created, it will display all the products that make up the kit you have configured. This formula acts as the basis that tells the system which items it consists of and in what quantities. From this moment on, when making a sale, you will only need to select the kit, and all the products defined in the formula will be automatically included, simplifying the sales process and ensuring proper inventory control.
Inventory Adjustments: Increasing or decreasing stock manually and its accounting implications.
The system allows you to manually modify product stock, either to increase or decrease stock. This process is useful in situations such as losses, surpluses, data entry errors, or adjustments required by physical counts. It is important to note that these movements have accounting implications, as they can affect the cost of inventory and the company's financial reports. Therefore, it is recommended to maintain proper control and justify each adjustment clearly to maintain the integrity of the information in the system.
Update Inventory
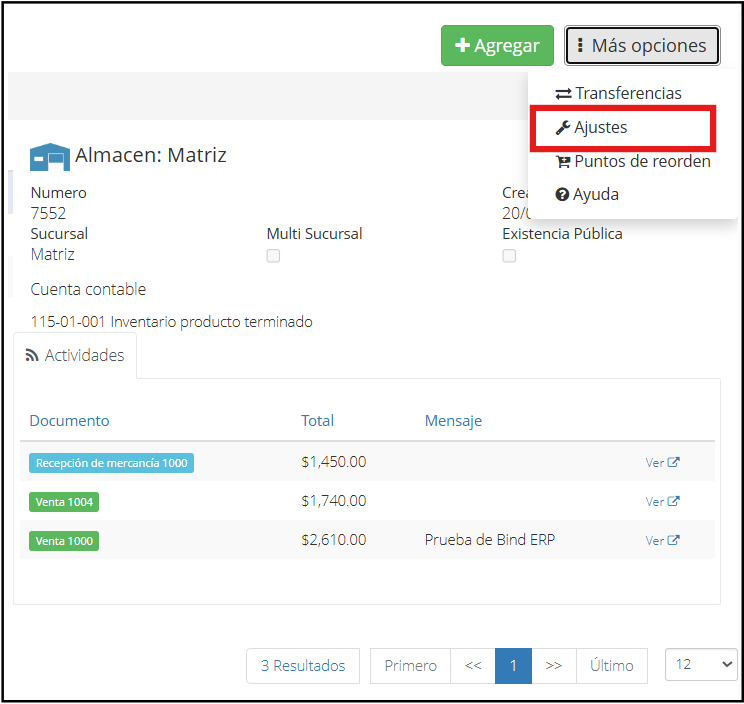
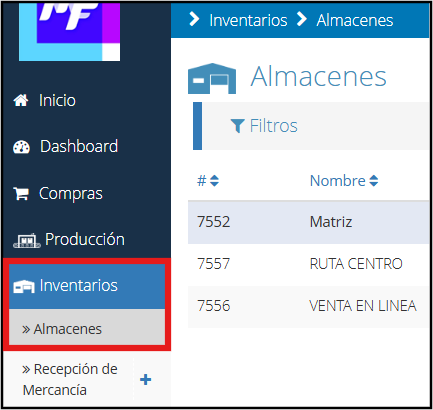
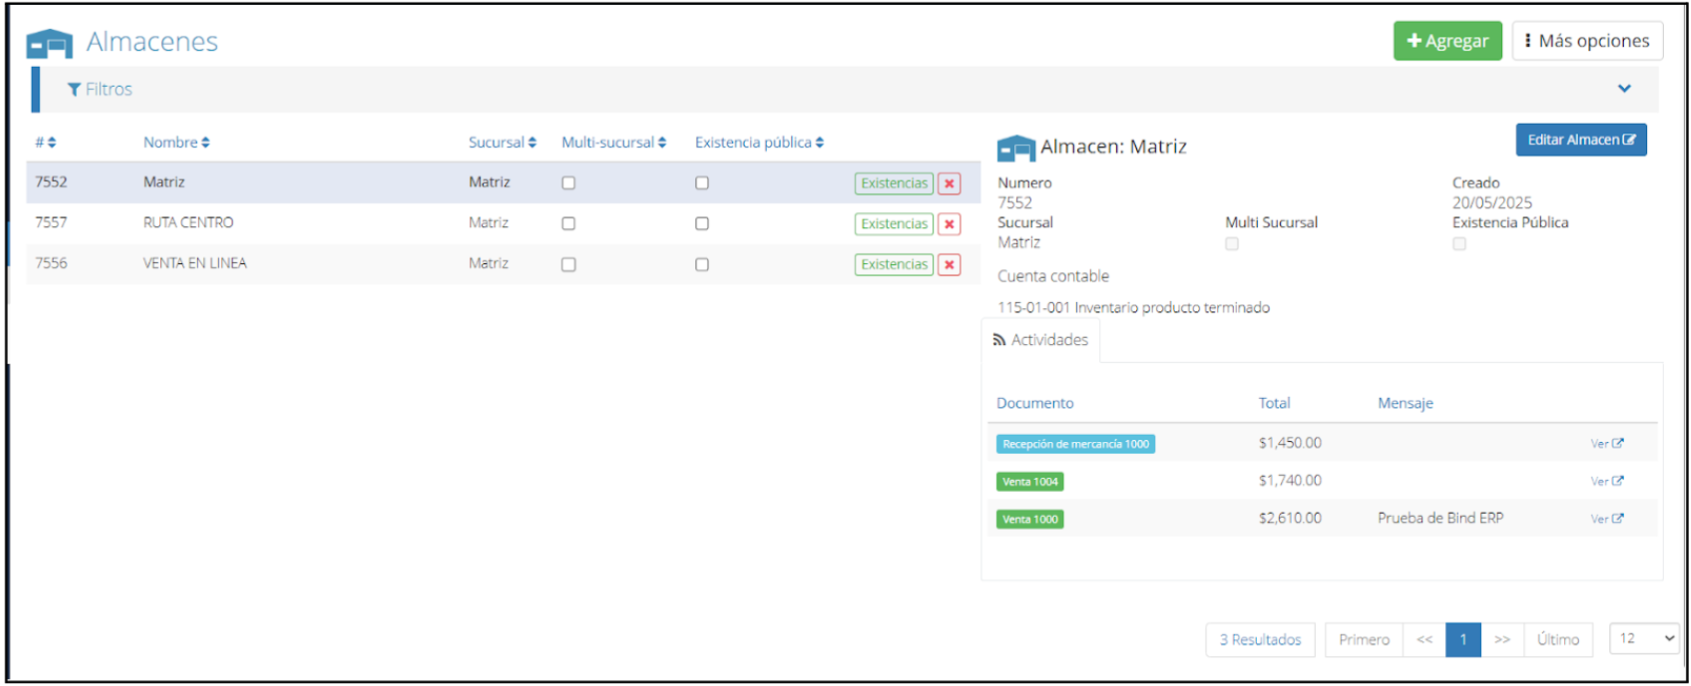
Access the “Inventory” module from the main screen and choose the “Warehouses” option.

Within the warehouses section, click on the “More options” button and choose the “Adjustments” option.
Once inside the adjustments section, click the “Add” button.
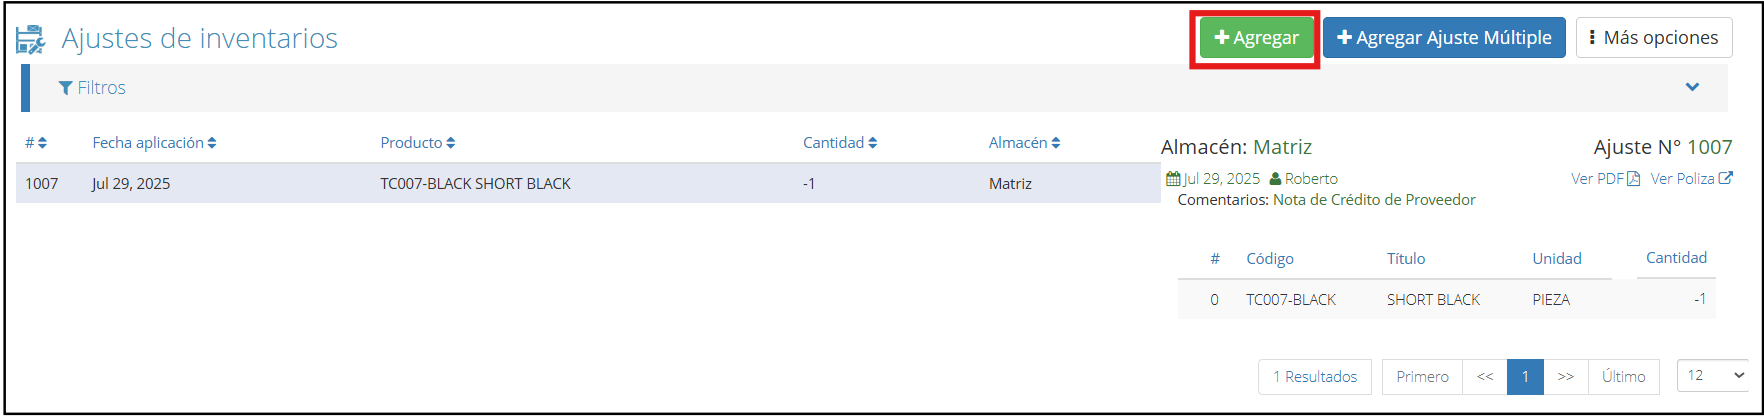
The following screen will be displayed where you can make adjustments to the existing inventory.
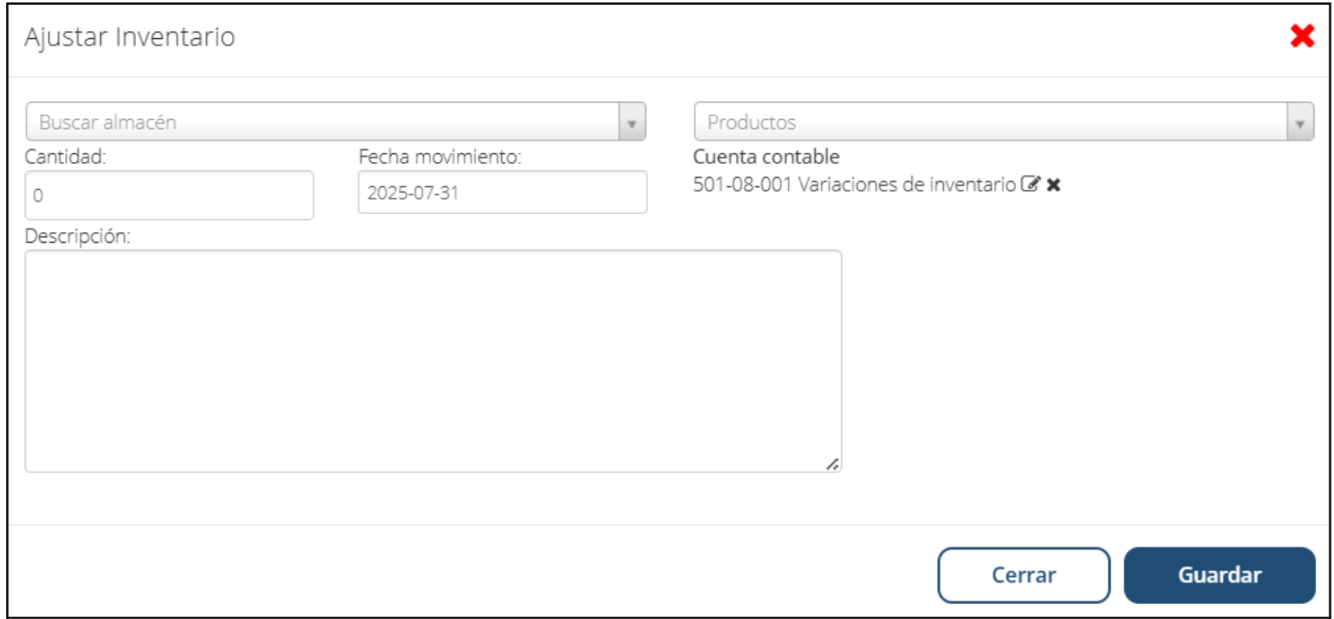
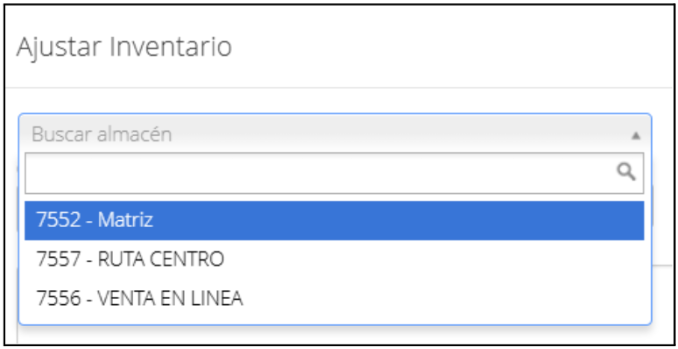
First, you must select the warehouse where the adjustment will be made.
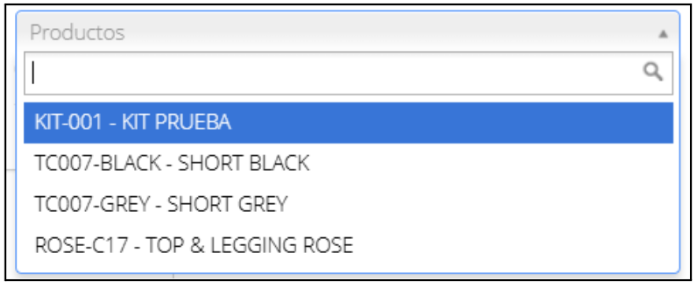
Once the warehouse is selected, click on the products option where the list of existing products in the inventory will be displayed, and select the one to be adjusted.
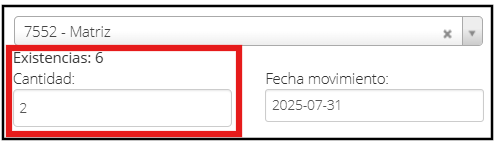
Now enter the quantity. Before doing so, check the number that appears above quantity; this number indicates the current stock in inventory. If you want to increase the stock, you must enter a positive value that, when added to the current inventory, will give you the desired total.
For example, if you have 6 units and want to reach 8, just type the number 2. The system will add both values and result in 8 units.
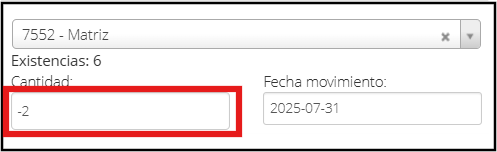
If, on the contrary, you want to subtract units, enter the number you want to subtract with the (-) symbol as a prefix.
For example, if you have 6 units and want to decrease to 4, just type -2. The system will subtract both values and result in 4.
To finish, choose the date the movement will take place and add a description. Locate the “Save” button and click on it. The system will have saved the inventory modification.
Transfers between Warehouses: Moving inventory from one branch to another.
Transferring between warehouses allows you to move inventory from one branch to another in a controlled and orderly manner. This function is useful when you need to redistribute products according to demand or availability. Every movement is recorded, ensuring clear tracking of stock between distribution centers.
Merchandise Transfer
Access the “Inventory” module from the main screen and choose the “Warehouses” option.
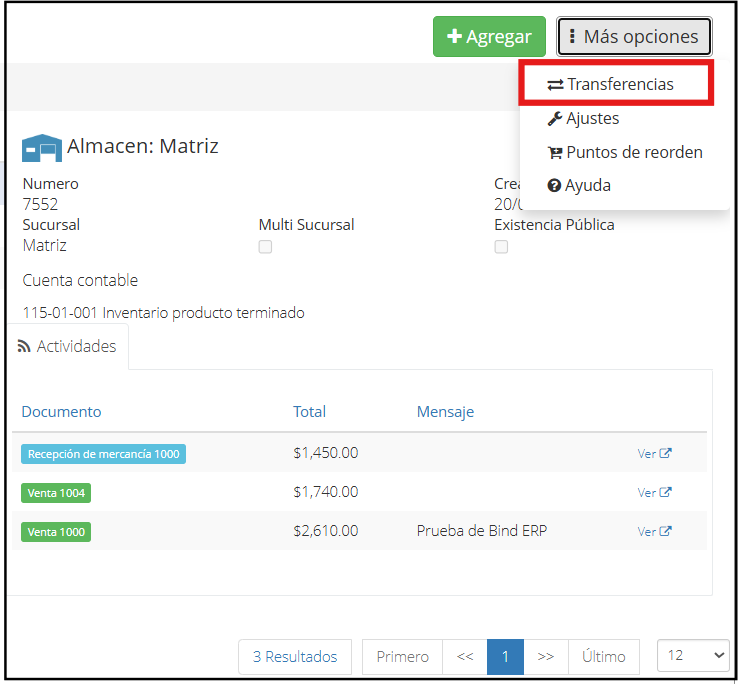
Within the warehouses section, click on the “More options” button and choose the “Transfers” option.
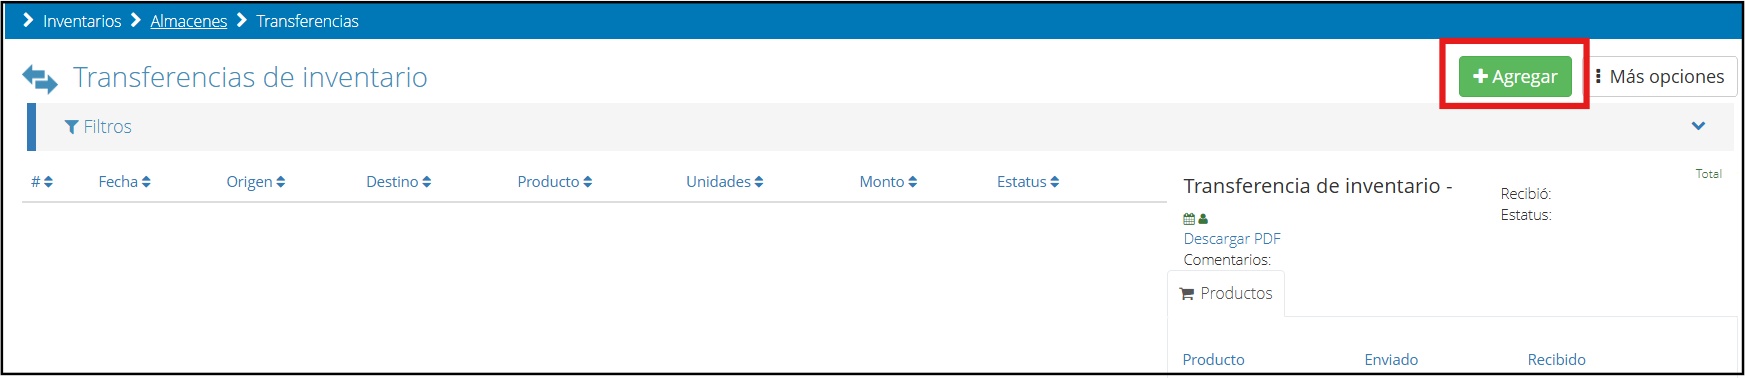
Once inside the transfers section, click the “Add” button.
The following screen will be displayed where you will have to fill in the fields with the requested information.
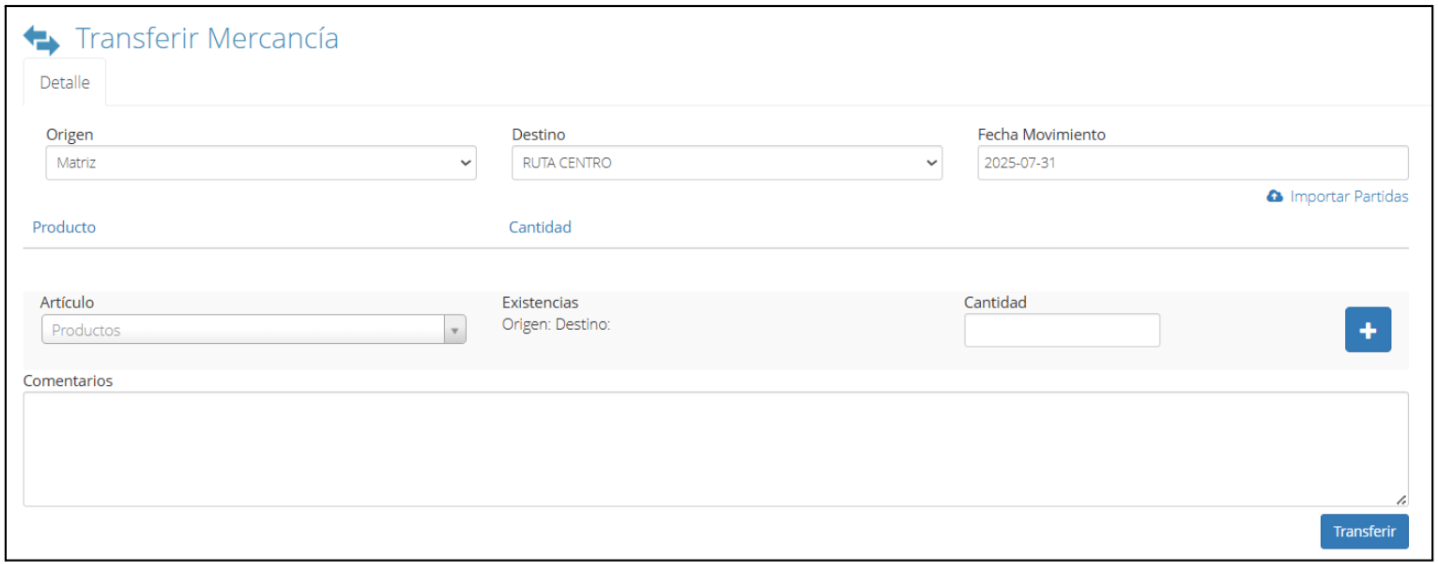
First, you must select the origin warehouse, that is, from where it is being sent, and also select the destination warehouse.

Now choose the product you want to transfer and indicate the quantity. The system will automatically show how many units are available in the origin warehouse and how many are registered in the destination warehouse. Once this data is completed, click the + button to add the transfer.

To finish, you can add a comment and click “Transfer”.

The system will show you the following screen with the transfer information.
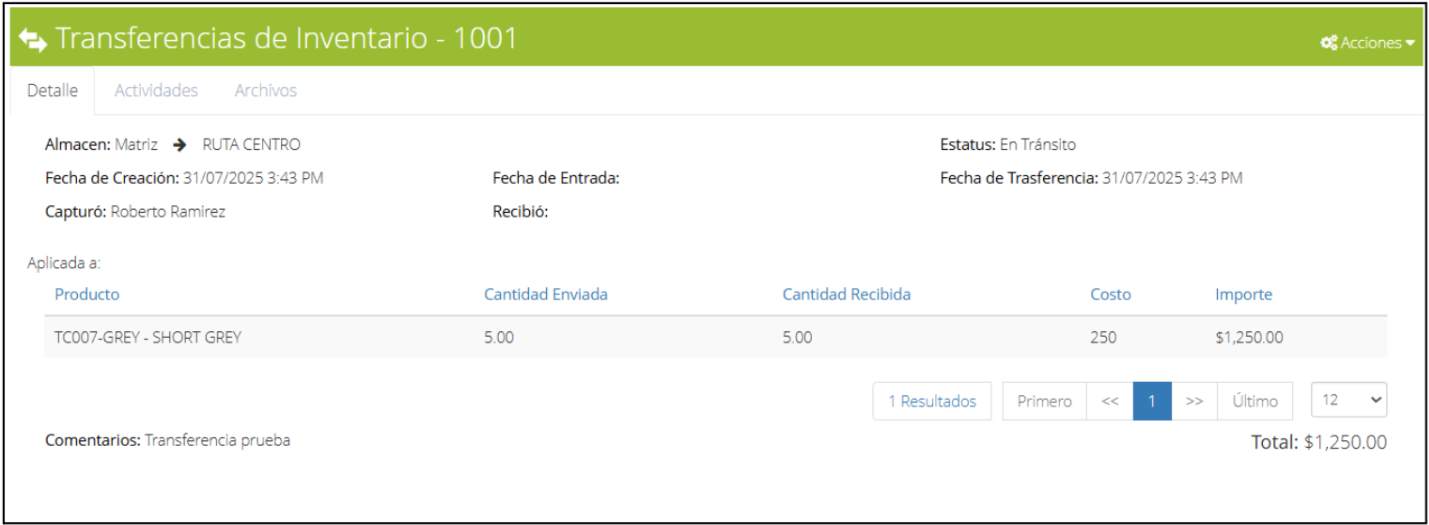
Receiving a Transfer
To complete the transfer process, it is necessary to register the receipt of the transfer, as the merchandise still appears with the status “In Transit”.
For this, you must click on the “Actions” option and choose the “Register Entry" option.
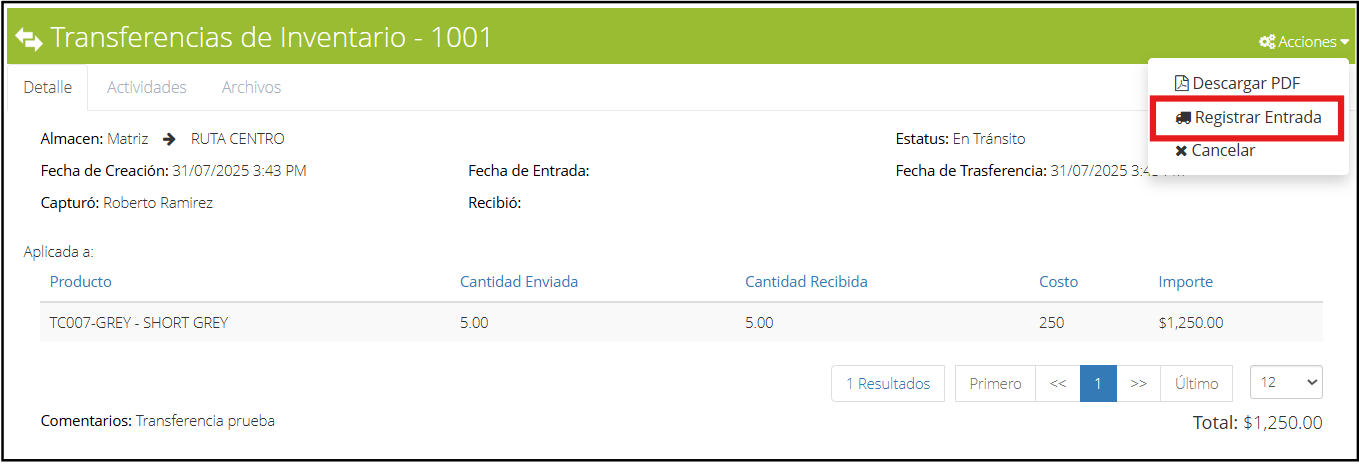
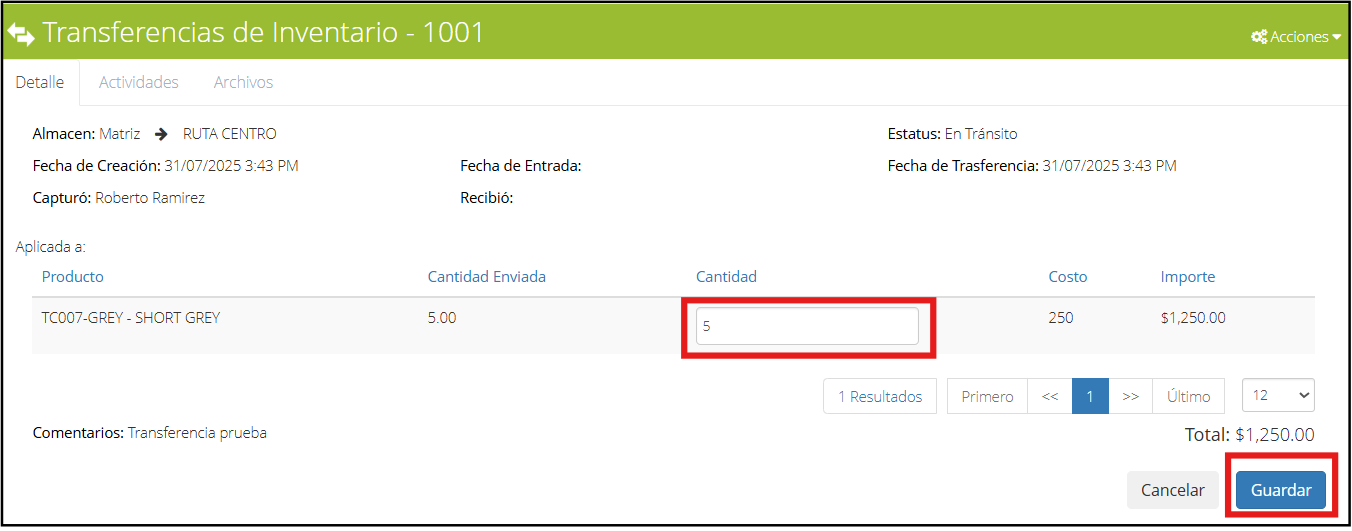
Here it is necessary to verify the quantity received and click “Save”.
This way, the transfer will have been successful.
Physical Counts (Cycle Counting): The process for conducting a physical inventory and adjusting the system.
Proper inventory management is key to the smooth operation of any business, as it directly impacts profitability, customer service, and decision-making. Having accurate stock records helps prevent shortages, control losses, better plan purchases, and optimize warehouse space.
The Bind ERP system offers comprehensive tools to achieve total inventory control, allowing you to register products, classify them, distribute them in warehouses, monitor stock in real-time, and make physical adjustments efficiently and orderly.
One of the methods that can be applied to keep the inventory updated is cycle counting, which consists of performing partial inventory counts periodically, without stopping daily operations.
Below we show you how you can implement it step by step within the system.
Step 1: Make sure you have your products registered in the system
Before starting a cycle count, make sure you have created all the products your business handles. If you haven't added them yet, go to the Purchases > Products module, and register each one with its attributes (type, code, unit of measure, etc.).
Step 2: Classify your products in warehouses
It is important to have the products organized by warehouses or locations within the system. This will allow you to perform counts in a more orderly fashion, by specific zones or categories.
Step 3: Plan the group of products to be counted
Select a category or family of products, or choose a specific warehouse to do your first count. The idea of cycle counting is to review the inventory in parts, on a scheduled basis, without interrupting activities.
You can use a printed format or a spreadsheet to keep track of the physical count and later compare it with the system data.
Step 4: Perform the manual physical count
Physically check the selected area and record the actual quantity of each product. It is recommended to use barcode readers if you have them, to facilitate the process.
Step 5: Compare and adjust in the system
Compare the data from the physical count with the stock registered in Bind ERP. If there are differences, make the necessary adjustments from the Inventory module.
Note: This procedure has already been described in the section “Inventory adjustments: increasing or decreasing stock manually and its accounting implications”.
Repeat this process in different areas of the warehouse throughout the month, so that the entire inventory has been counted at least once in a given period. This helps maintain accuracy in stock levels without the need for general inventories that stop the operation.
Managing Lots, Import Documents, and Expiration Dates: Advanced control for regulated industries.
Sometimes, certain products require more detailed and specific control, whether due to regulations, traceability, or quality issues. For this, Bind ERP offers advanced functions that allow managing information related to lots, import documents, and expiration dates, facilitating precise inventory administration.
These tools are especially useful when it is necessary to know the product's origin, its shelf life, or the documentation that supports it, as is the case with products with a limited useful life or imported ones. Having this information allows for better logistical decisions, avoiding losses, maintaining fiscal order, and complying with operational and legal requirements.
Below, we explain what each of these configurations consists of:
Lots: They allow grouping units of the same product that share common characteristics, such as production date or entry into the warehouse. This facilitates traceability, rotation, and inventory control.
Import Documents: They are related to imported merchandise, allowing each product to be associated with the corresponding import document number for tax and audit purposes.
Expiration Dates: They serve to record the useful life of a product. The system can alert about products close to expiring, which helps in making timely decisions and ensuring proper rotation.
This section will show the step-by-step process to add these 2 configurations to a single product and add the expiration date.
Configure products
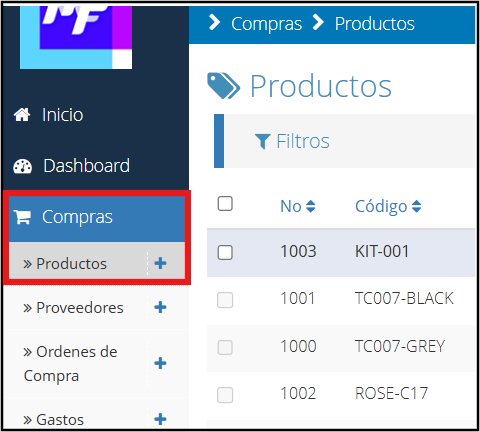
Access the “Purchases” module from the main screen and choose the “Products” option.
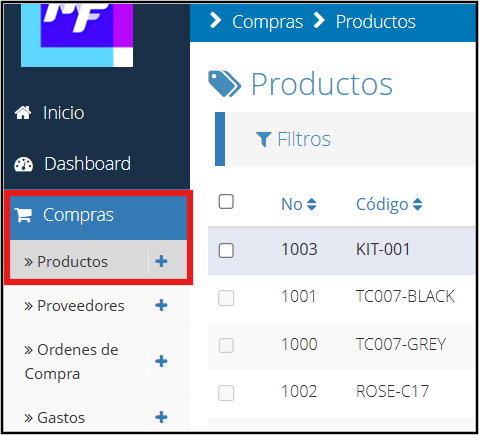
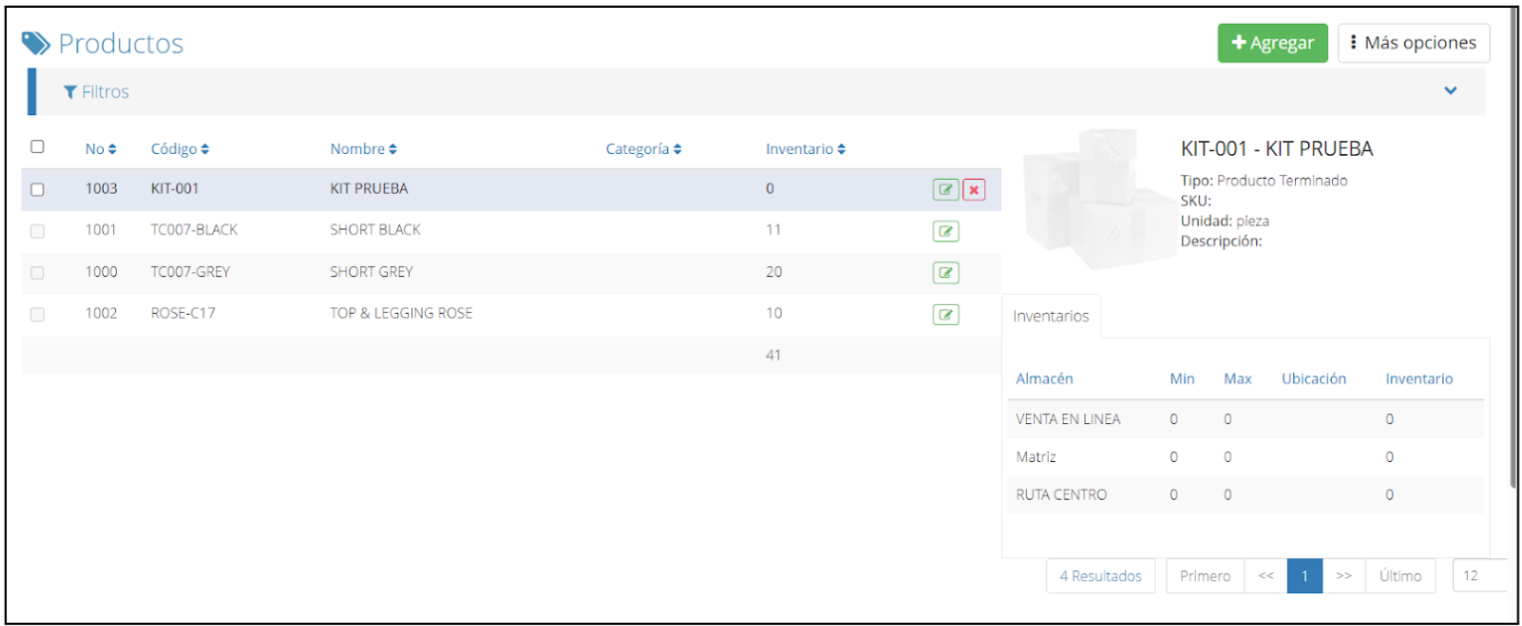
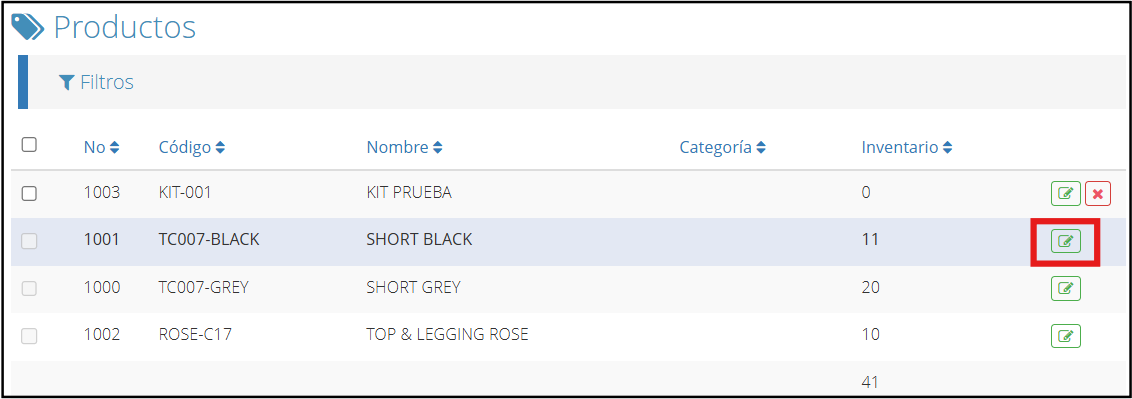
On the screen, you will find the products you have available; choose one and click on the green icon.
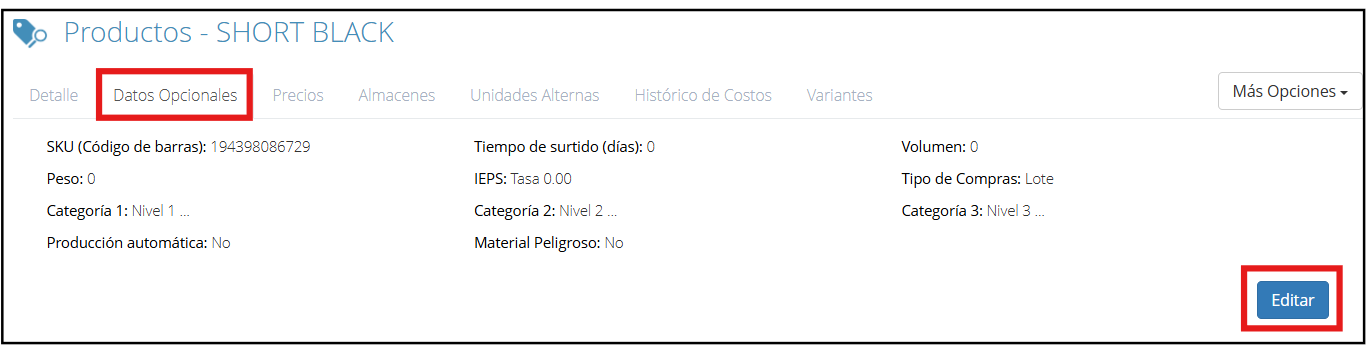
Once inside, go to the “Optional Data” tab and click “Edit”.
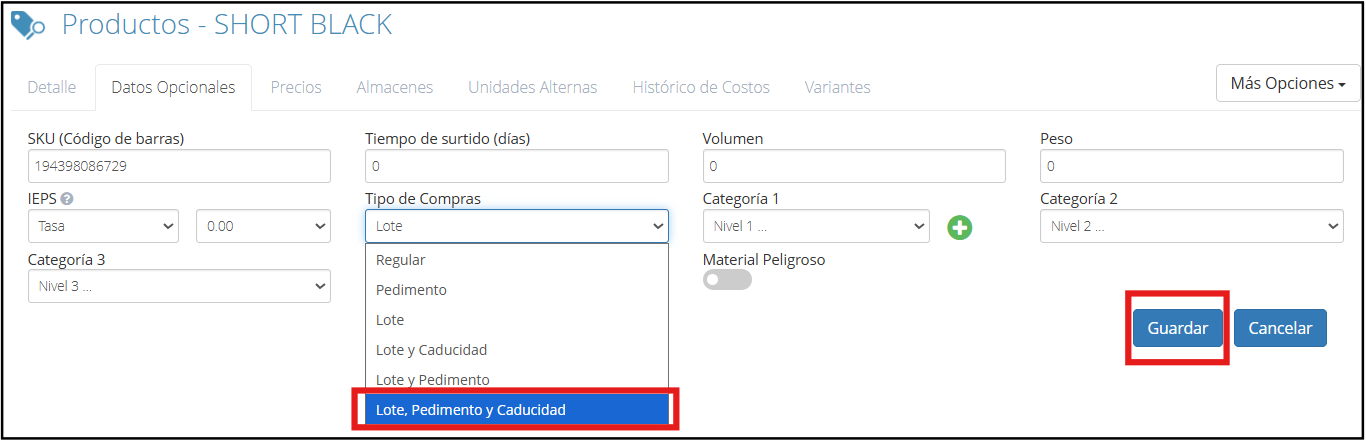
Click on the field called “Purchase Type” and a series of options will be displayed where you can choose the one you need. In this case, we will choose “Lot, Import Document, and Expiration”.
After selecting the option, click “Save”.
Add lots and import documents
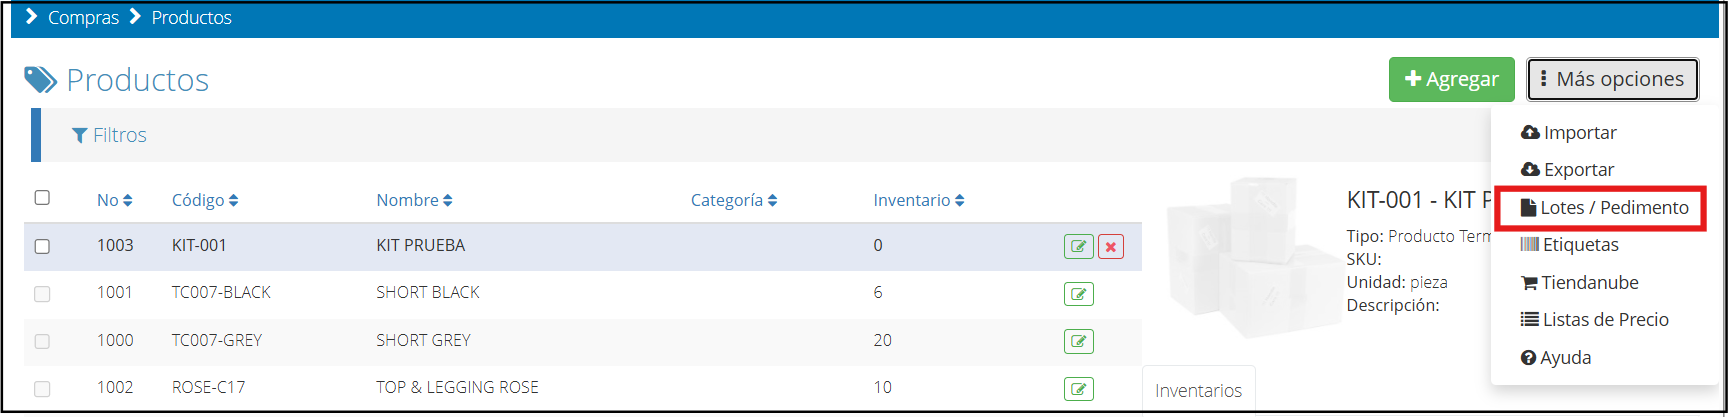
Once the products are configured, go back to the products screen, locate the “More options” option and click on “Lots / Import Documents”.
Within this section, click on “New”.

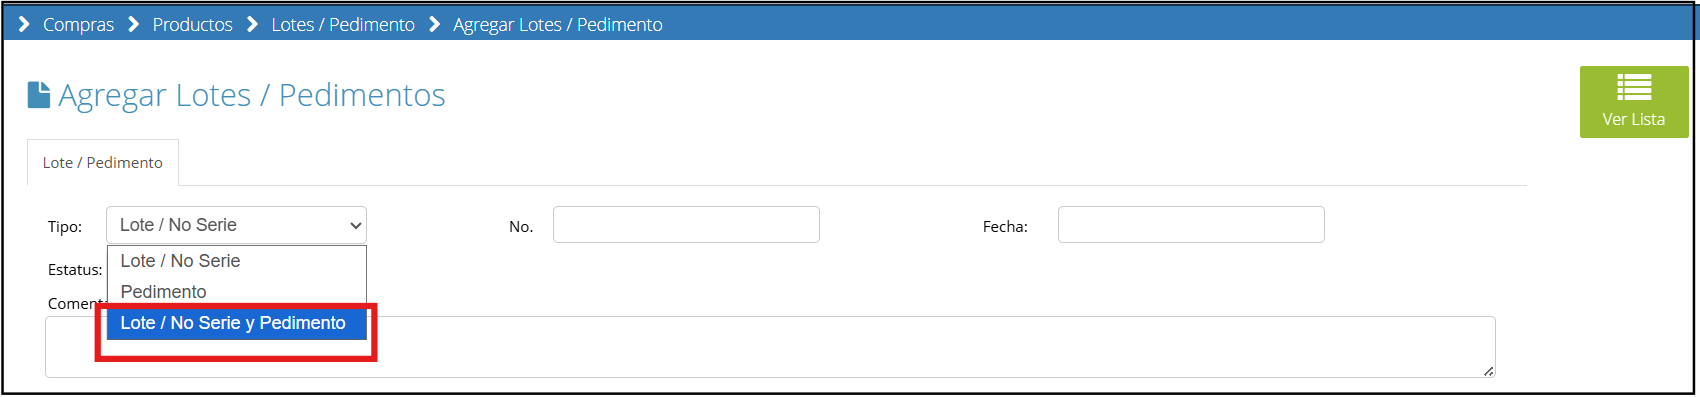
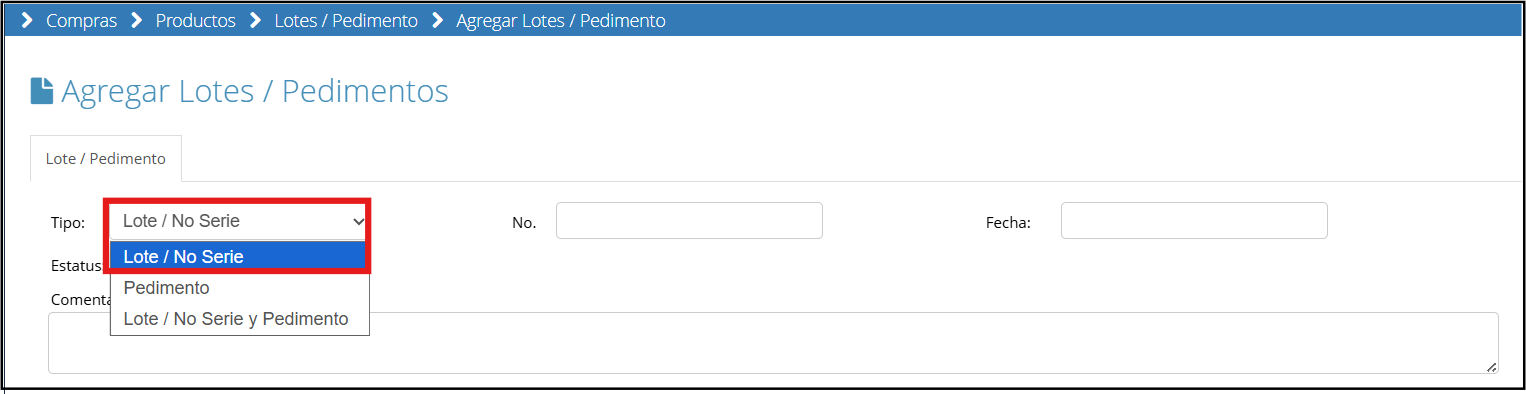
On this screen, you must select the “Lot / Serial No. and Import Document” option and complete all the requested information.
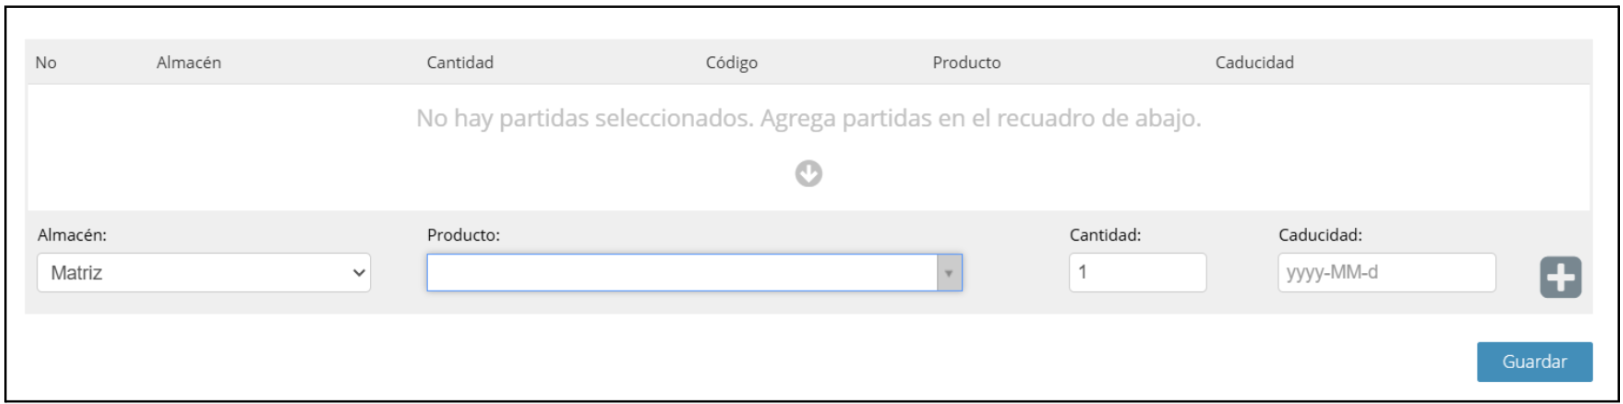
Continue with the selection of products you previously configured, completing fields such as warehouse, quantity, and expiration date, and click the + sign to add them.
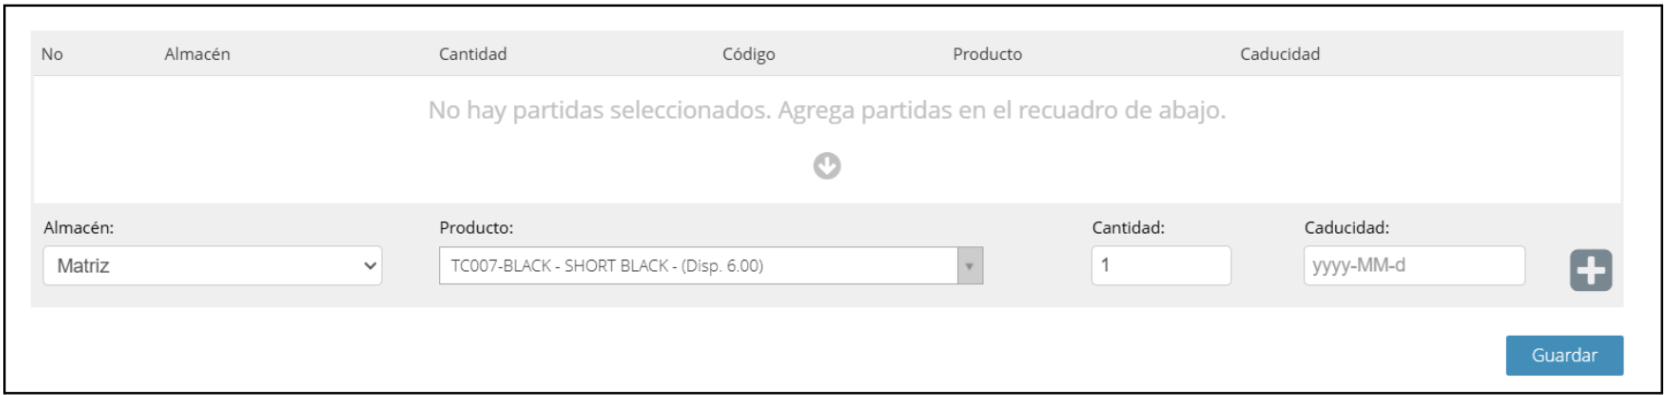
To finish, click “Save”.
Using Lot/Serial Numbers: Assigning and tracking individual products.
In this section, we will focus on the use of Lot/Serial Numbers during operations within the system. This functionality allows for individual or batch tracking of products, which is especially useful in industries that require traceability, quality control, or regulatory compliance.
The first thing you should keep in mind to work with Lot/Serial Numbers is that the products must already be previously registered in the system. When adding them, it is essential to correctly configure the “Purchase Type” field by selecting the “Lot” option.
Access the “Purchases” module from the main screen and choose the “Products” option.
Once inside the products section, locate the “More options” option and click on “Lots / Import Documents”.

Within this section, click “New”.

On this screen, you must select the “Lot/Serial No.” option and complete all the requested information.
Continue by selecting the products you previously configured, completing fields such as warehouse, quantity, and expiration date, and click the + sign to add them.
To finish, click “Save”.
Product Costing: Understanding the difference between FIFO, LIFO, and Average Cost.
When managing inventories in a system like Bind ERP, it is essential to understand how the cost of stored products is determined. This process, known as costing, directly impacts inventory valuation and the company's accounting reports. Below are the three most common methods: FIFO, LIFO, and Average Cost.
FIFO (First-In, First-Out)
This method assumes that the first products to enter the inventory will be the first to leave. It is ideal when you want to reflect the oldest cost in sales, and it is commonly used in industries where products have expiration dates or rapid turnover, such as food or pharmaceuticals. When using FIFO, the ending inventory is calculated with the most recent costs.
LIFO (Last-In, First-Out)
Unlike FIFO, this method considers that the last products purchased are the first ones sold. It is often used in inflationary contexts, as it allows reflecting a higher cost of sales, temporarily reducing accounting profit.
Average Cost
This method calculates a weighted average each time a new purchase is made. That is, the system combines the cost of the existing inventory with the new one and divides by the total quantity. This way, each unit of the product has an equal, constantly updated cost. It is one of the most used methods due to its balance, simplicity, and compatibility with Bind ERP.
In Bind ERP, when creating a new product, you can select the costing type from the corresponding tab. The system mainly offers two options: Average Cost and Fixed Cost. This choice will determine how the value of your inventory will be calculated with each purchase or movement.