Purchasing and Suppliers in Bind ERP
This module explains the purchasing cycle: registering suppliers, creating purchase orders, receiving goods, recording expenses, managing accounts payable, and processing returns for complete control over acquisitions.
Module 2: Purchasing and Suppliers (Inbound Control)
The objective is to master the complete procurement cycle.
Supplier Registration: Add a supplier and configure their tax and contact information.
We will start by configuring your supplier base. Here you will learn to register each one with their tax and contact information to facilitate your purchasing processes and keep everything in order from the beginning.
Add a supplier
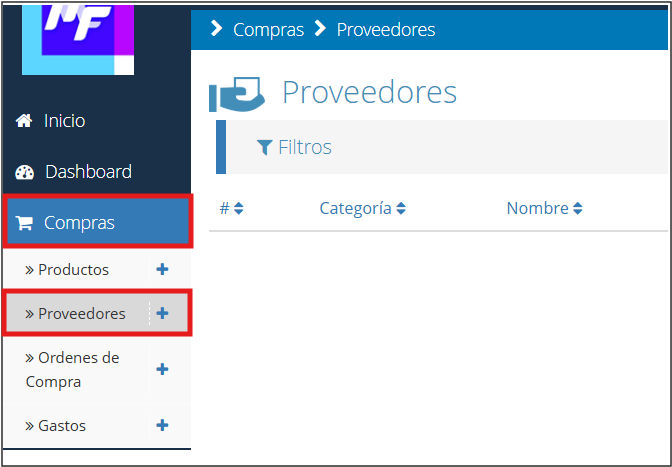
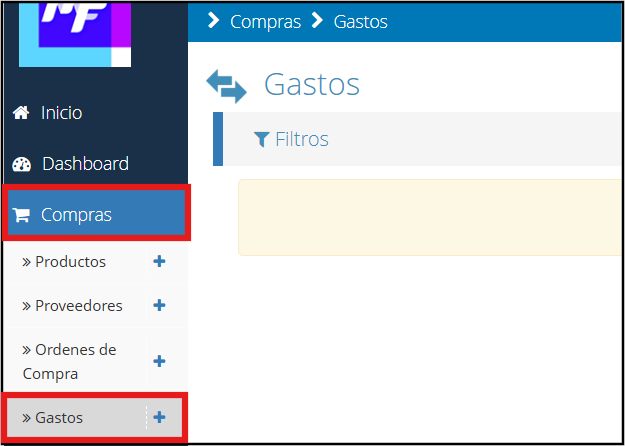
On the main screen, locate the “Purchasing” module and then “Suppliers”.
Once inside the suppliers section, you must click on the “Add” button to register a new supplier.

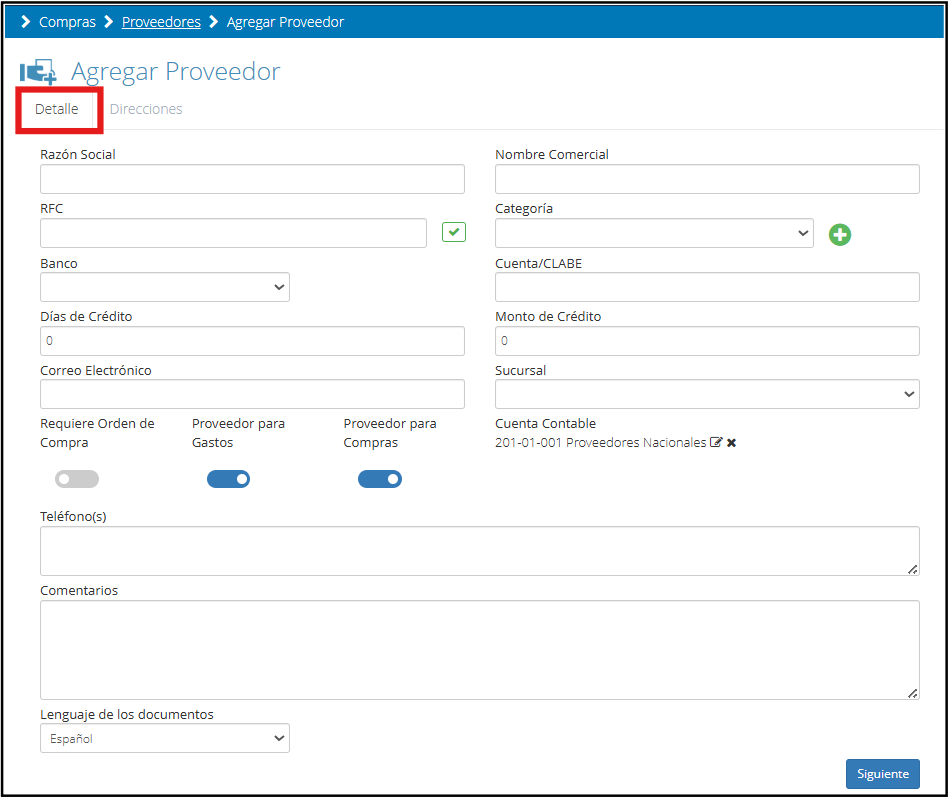
Once you click on the add option, a new window will open with two tabs: "Details" and "Addresses".
Details
You will need to complete the supplier's information, such as tax data and bank accounts, among other important fields.
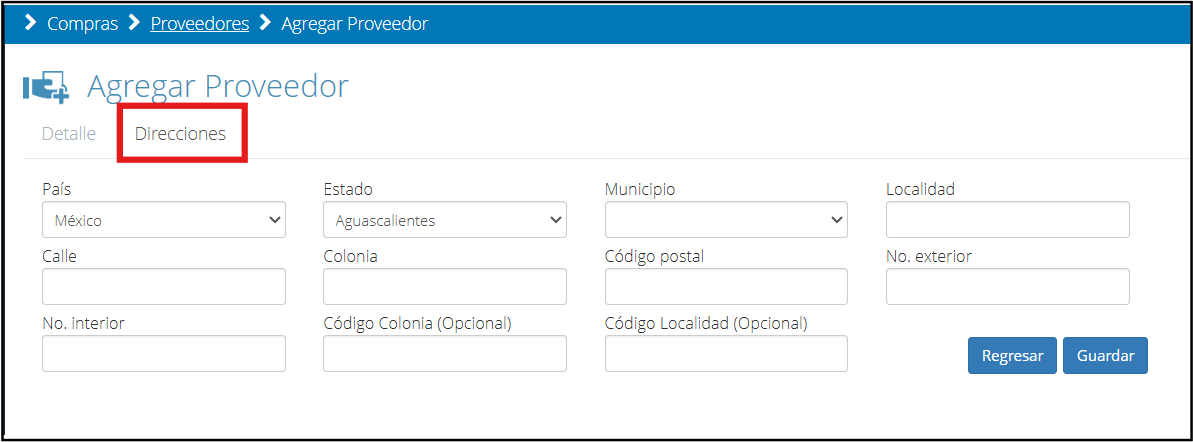
Addresses
After completing the details tab, click “Next” to move to “Addresses”, where you can enter the supplier's corresponding address.
Finally, click "Save" to register the supplier in the system.
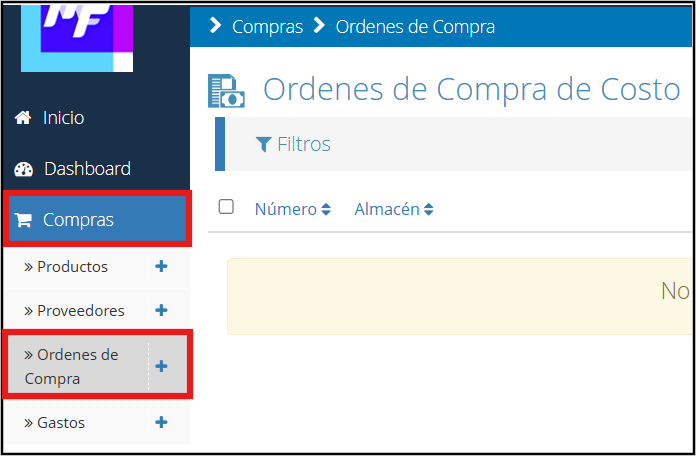
Generation of Purchase Orders: Create and send a purchase order to a supplier.
The purchase order is the base document that formalizes the acquisition of products or services. In this section, you will learn to generate purchase orders from the system, ensuring clear and efficient control of the purchasing process.
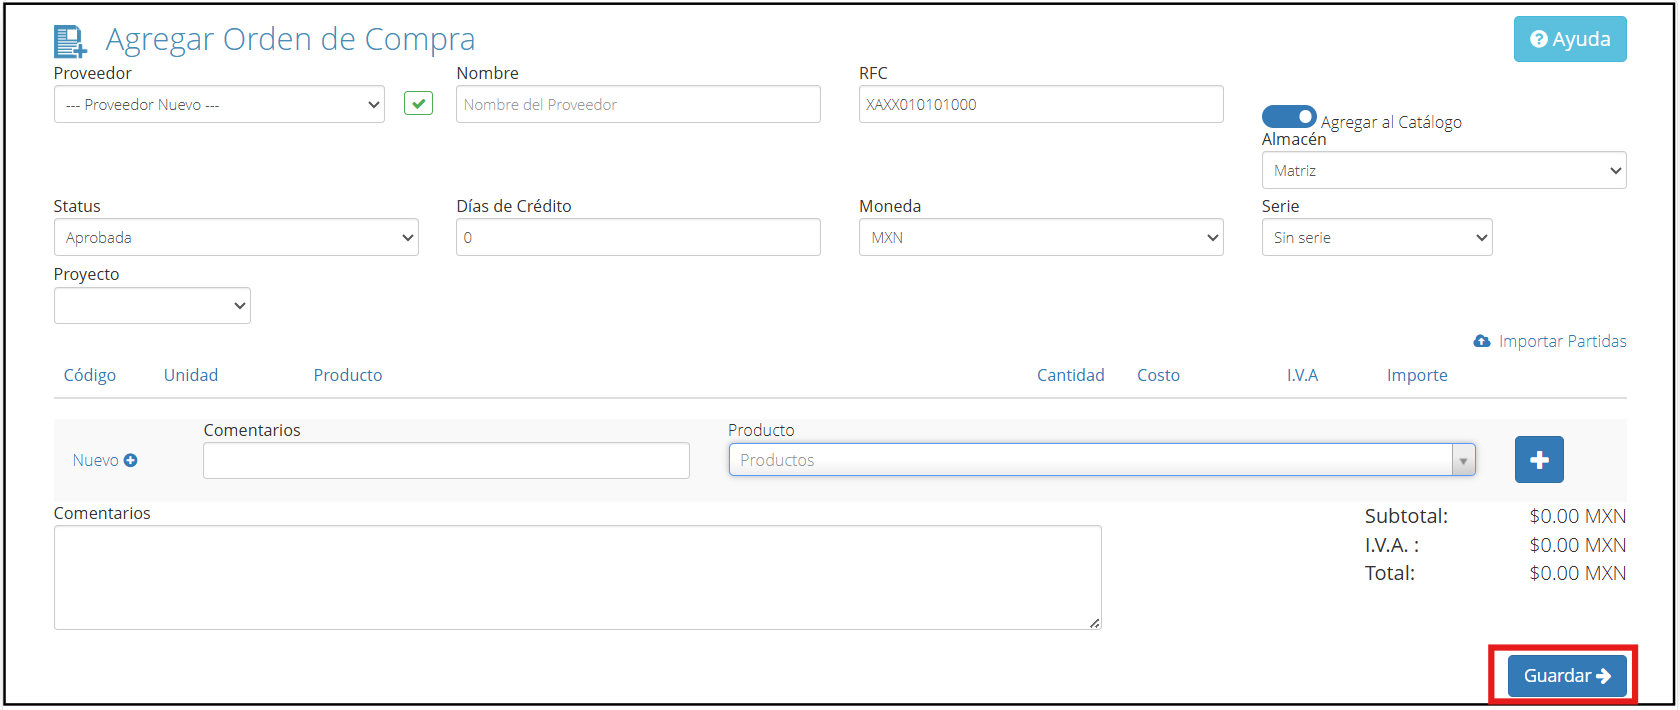
On the main screen, locate the “Purchasing” module and then “Purchase Orders”.
Once inside the purchase orders section, you must click on the “New” button.
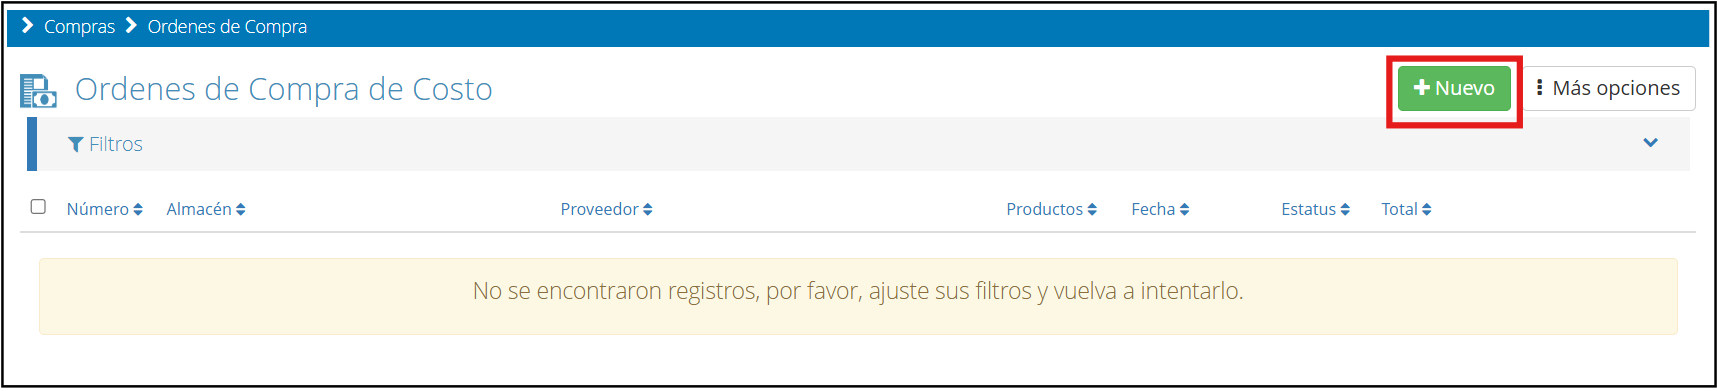
When you select this option, the system will show you the following screen where you must complete all the required fields to register your purchase order correctly.
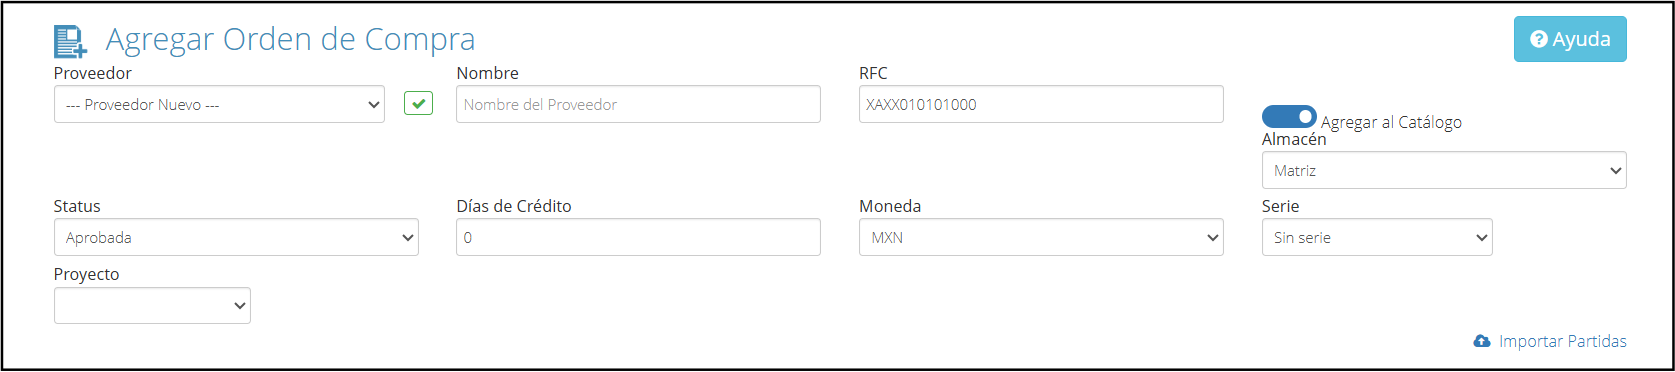
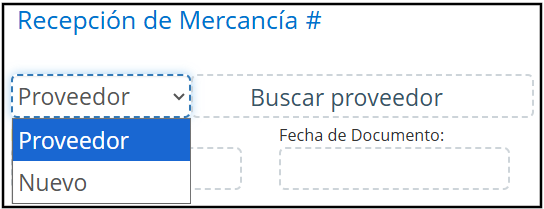
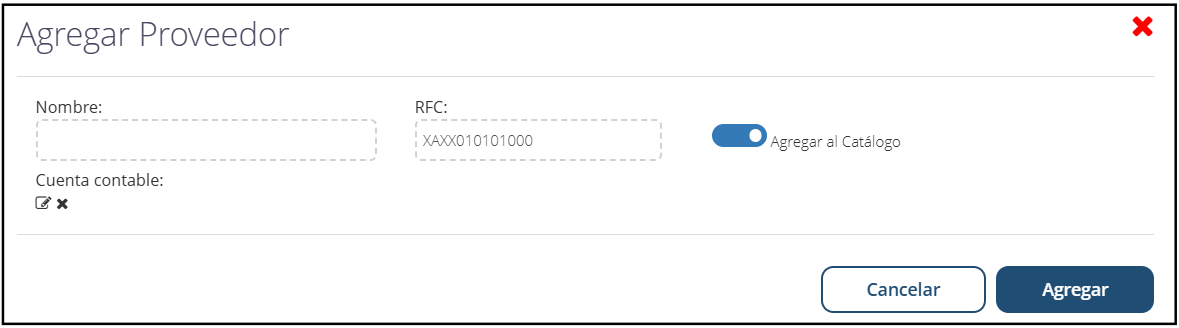
Start by selecting the supplier: if they are already registered in your system, simply choose them from the list. If it is a new supplier, activate the corresponding option and manually fill in the fields such as supplier name, RFC, credit days, and currency.
Also, make sure to set information such as the warehouse, the order's status, the credit days, the type of currency, the series, and, if applicable, the project to which the purchase will be assigned.
Finally, if you are registering a new supplier, don't forget to check the "Add to catalog" option so that it is saved in your system's supplier database.
Product Selection
Click on the Product box and the system will automatically show you a list with all available items. Choose the product of your preference and then click on the “+” icon that appears on the right to complete the remaining data related to the purchase.
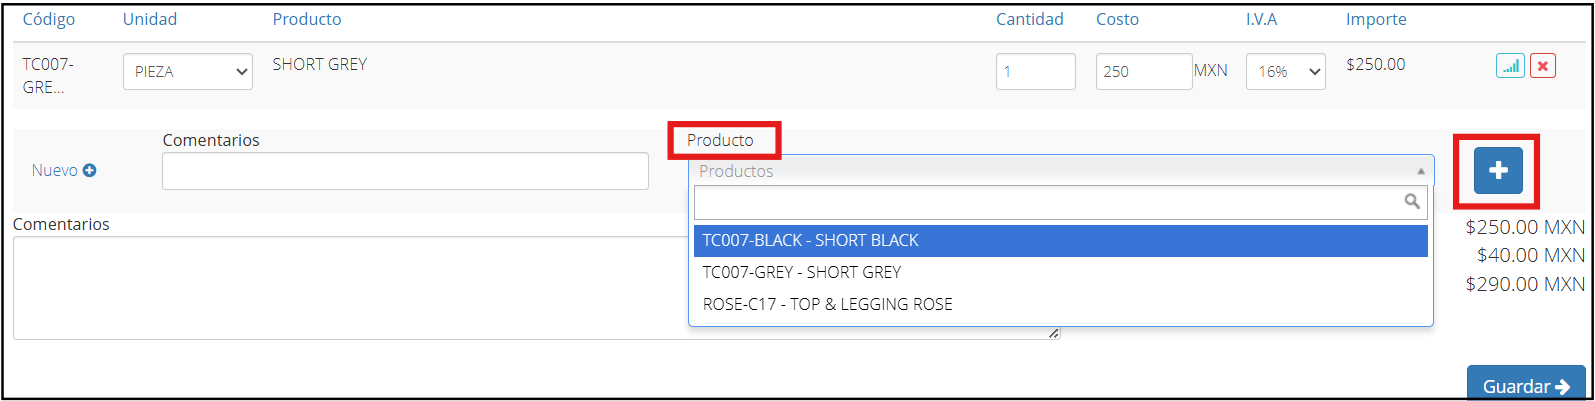
If the product you want to buy is not yet registered in the inventory, you can add it by selecting the “New” option.

To finish, enter a comment if you wish and click the “Save” button to register the order.
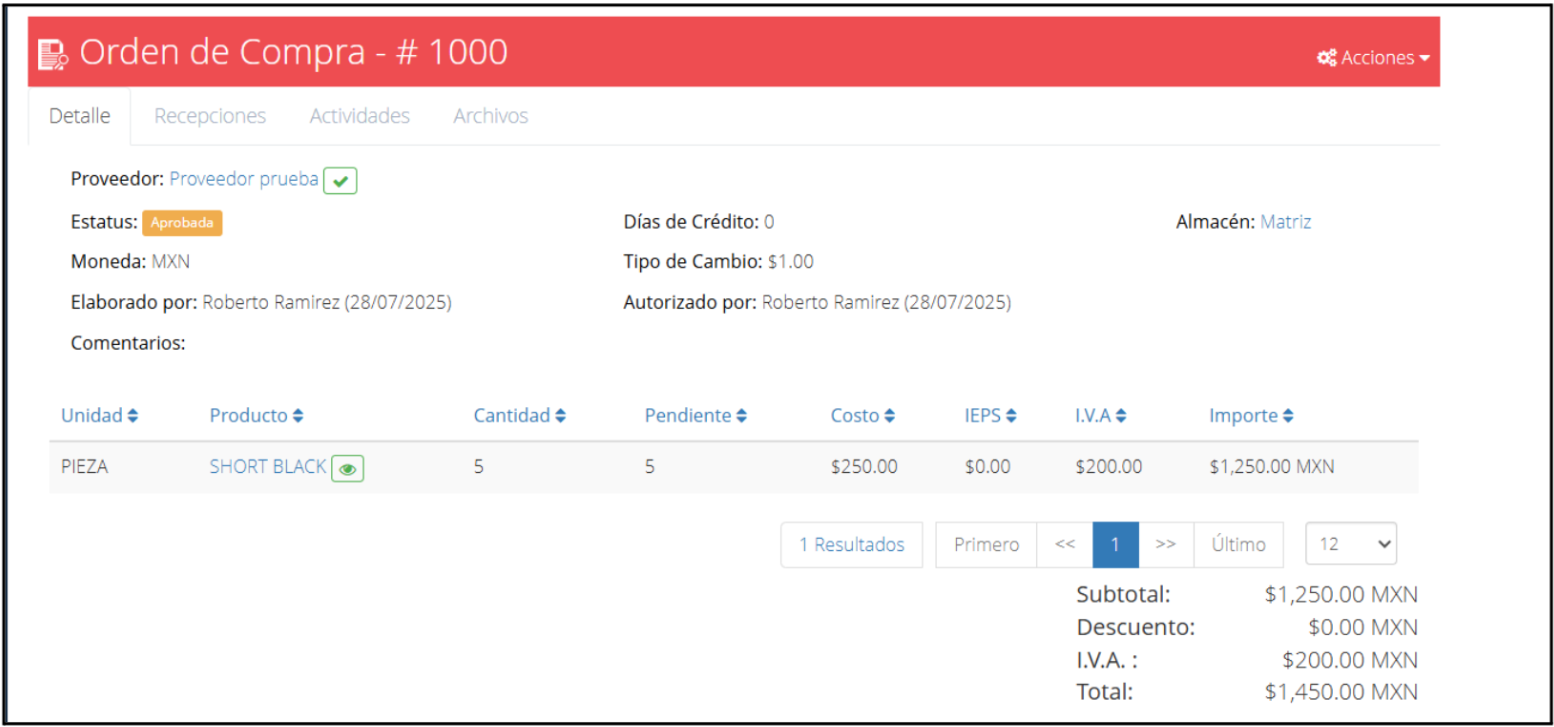
The purchase order detail interface will appear.
Goods Receipt: How to register the entry of products into the warehouse from a purchase order.
The receipt of goods is a key stage within the purchasing process, as it allows for validating that the products requested in a purchase order have been delivered correctly. In this section, you will register the physical entry of the items into the warehouse and their quantity.
On the main screen, locate the “Inventory” module and then “Goods Receipt”.
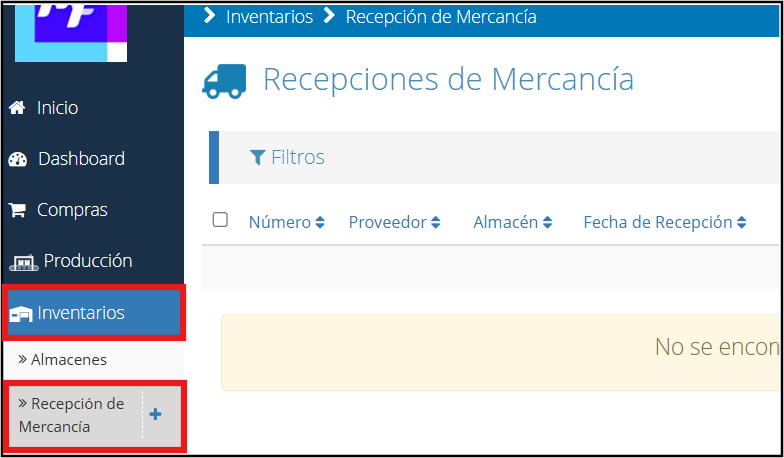
Once inside the goods receipt section, you must click on the “Add” button.
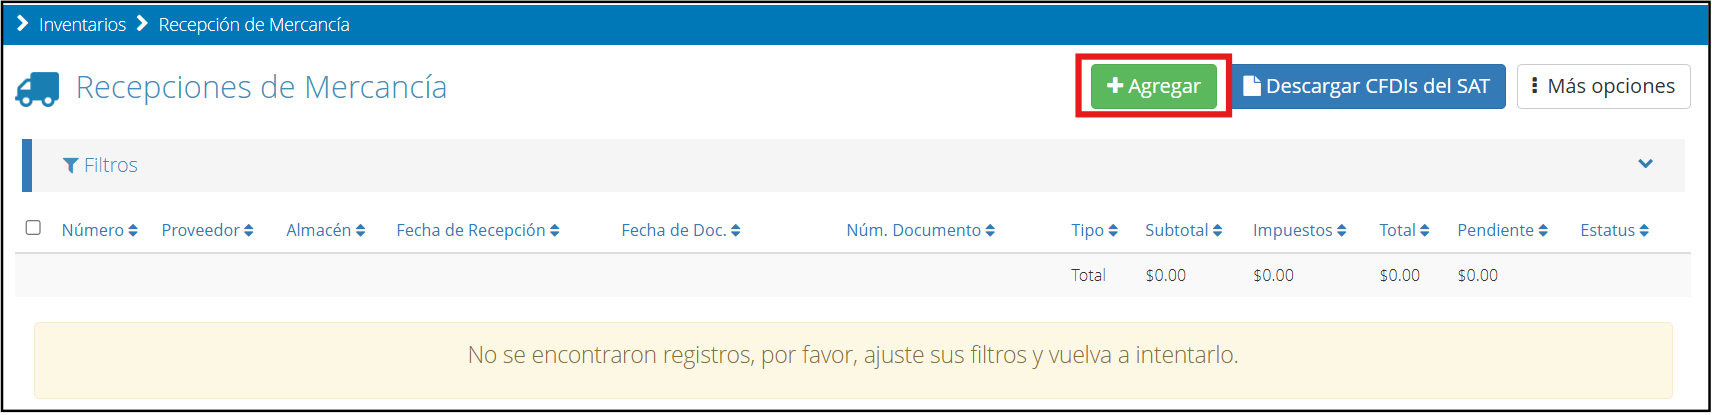
When you select this option, the system will show you the following screen where you must complete all the required fields for the goods you wish to register.
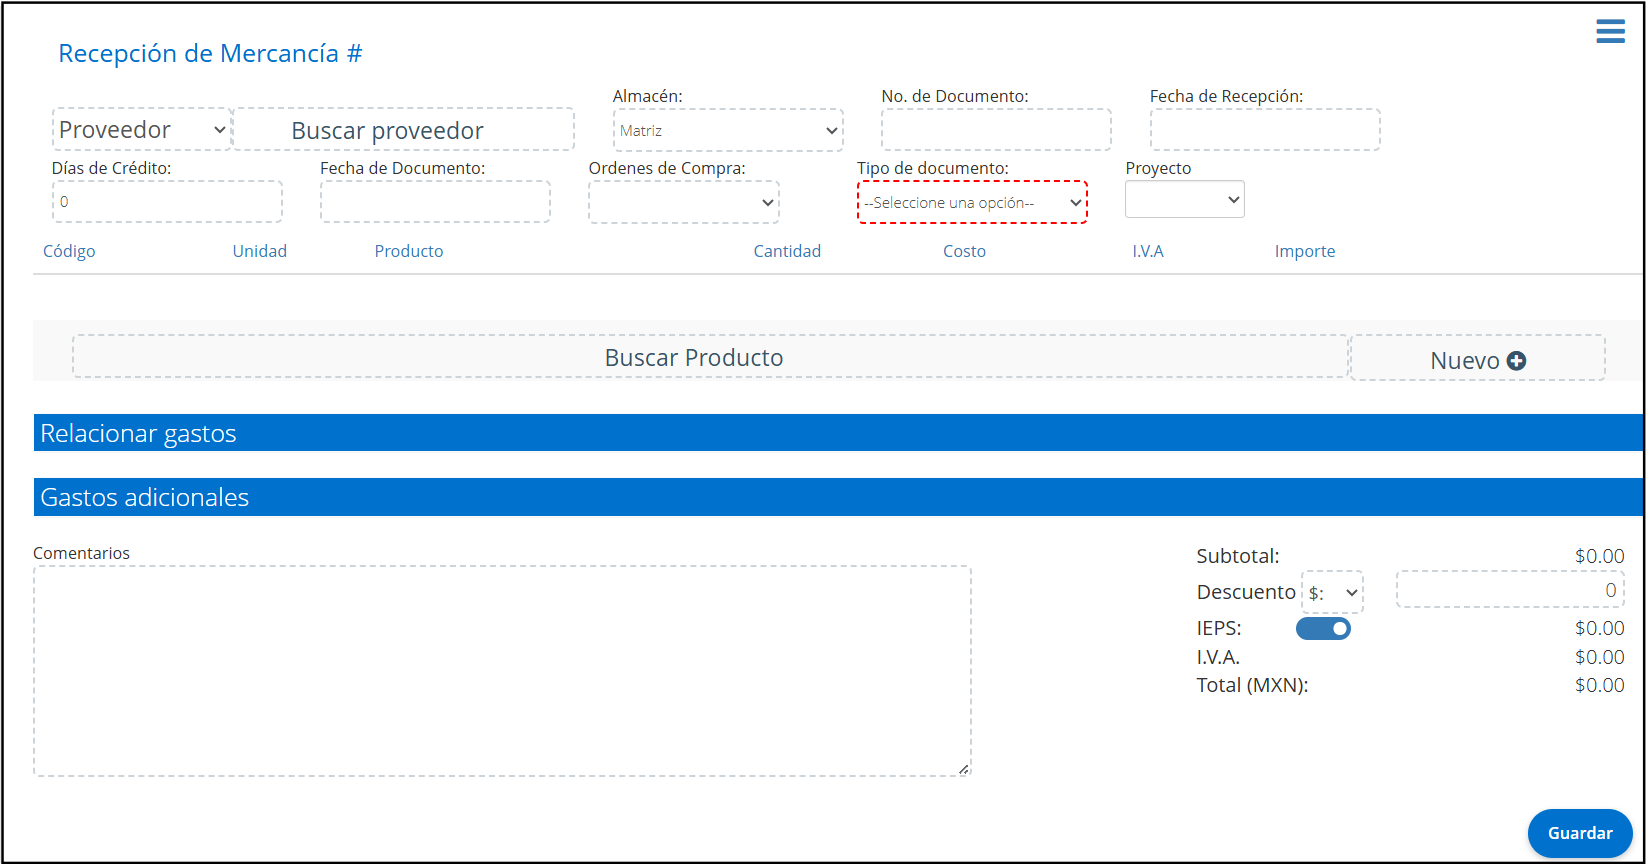
Supplier Search the list of existing suppliers and select one. In the case of a new supplier, select the “New” option and fill in the mandatory fields to register it.
General Data

Choose the warehouse where the goods will enter.
Register the document number.
Set the receipt date.
Define the credit days, if applicable.
Link an existing purchase order, in case the receipt comes from a previously created order.
Select the document type (invoice, delivery note, etc.).
Assign the related project, if any applies.
Select Product
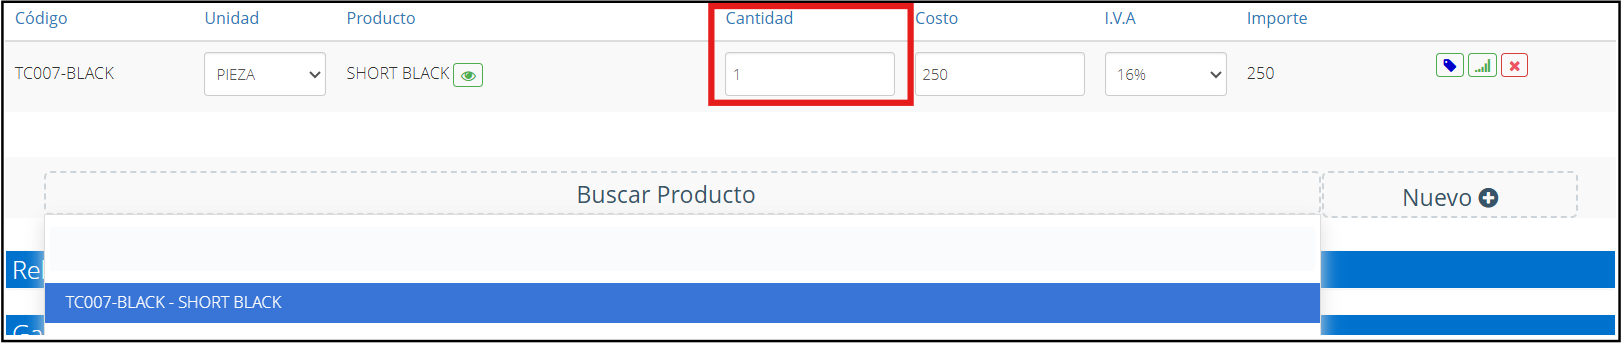
Once the general information for the receipt is complete, the next step is to select the product you are receiving:
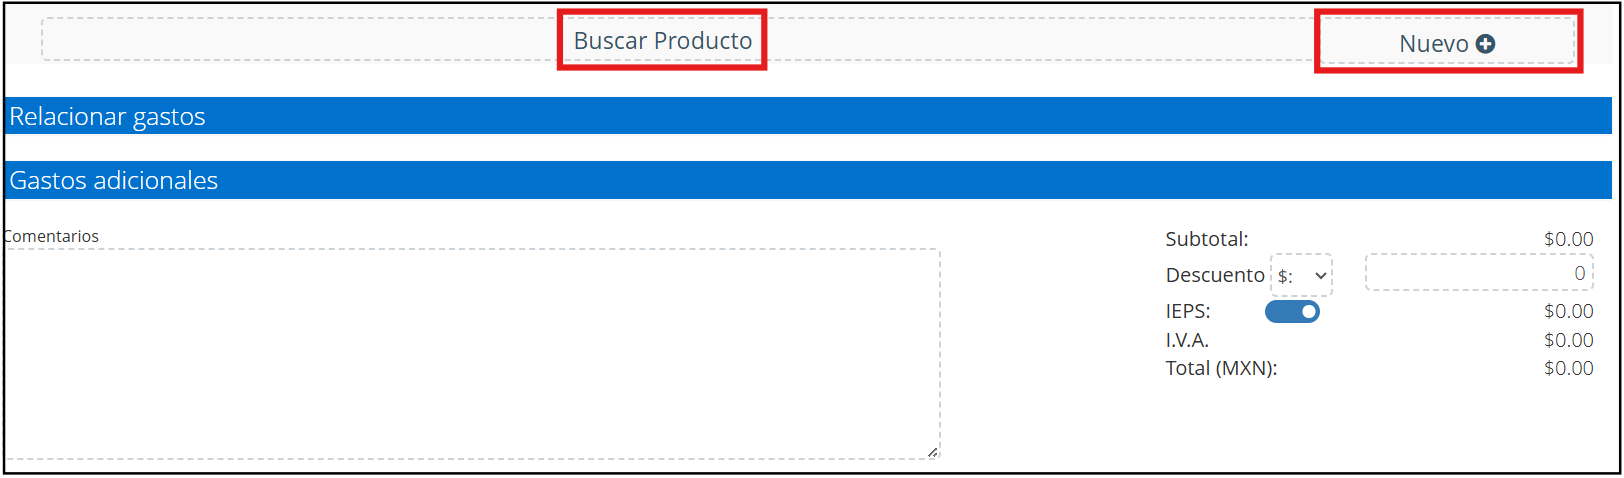
Click the Search product button to display the list of products registered in your inventory. Select the desired product from the list.
In case the product is not registered, you can add it by clicking on “New”.
When you choose a product, new fields will be enabled to complete, such as: Quantity of products received.
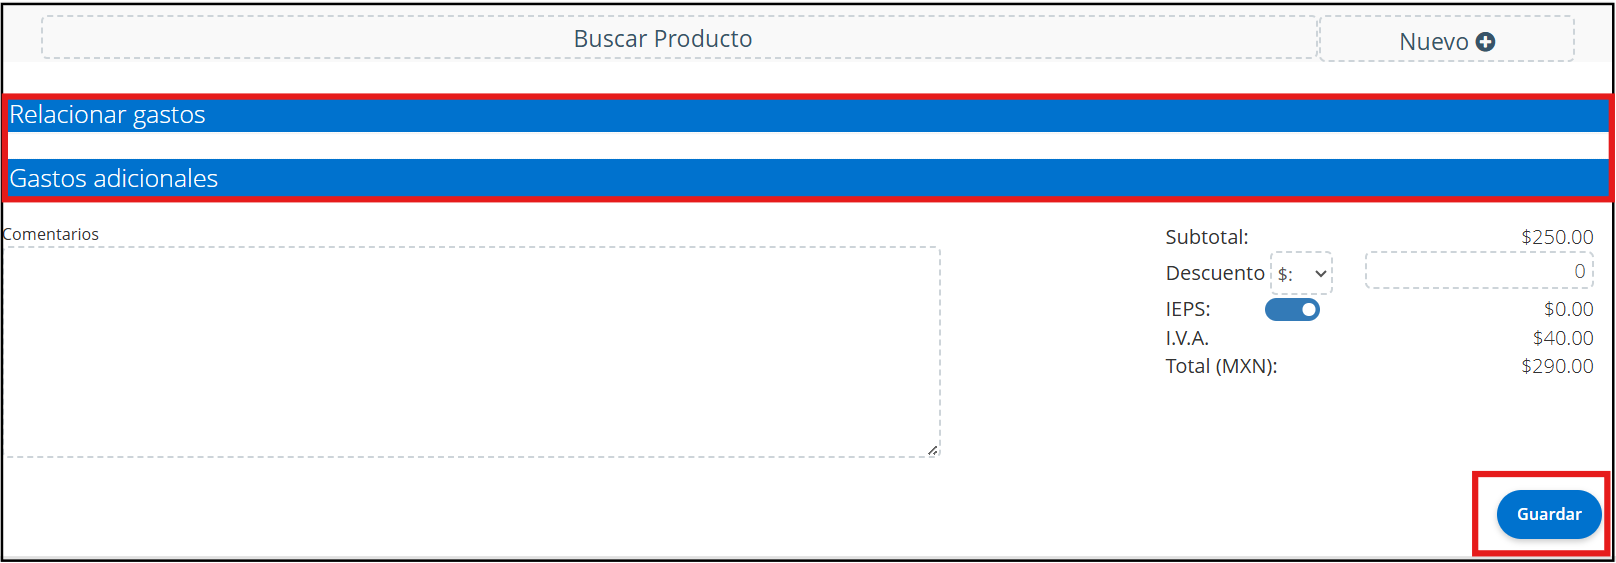
Once you have completed the necessary fields, you can decide if you want to add “Link expenses” or “Additional expenses” to the receipt. If so, simply click on the corresponding field to include them. Otherwise, you can add a comment and the respective amounts to your goods receipt.
Finally, click on Save to officially register this goods receipt in the system.
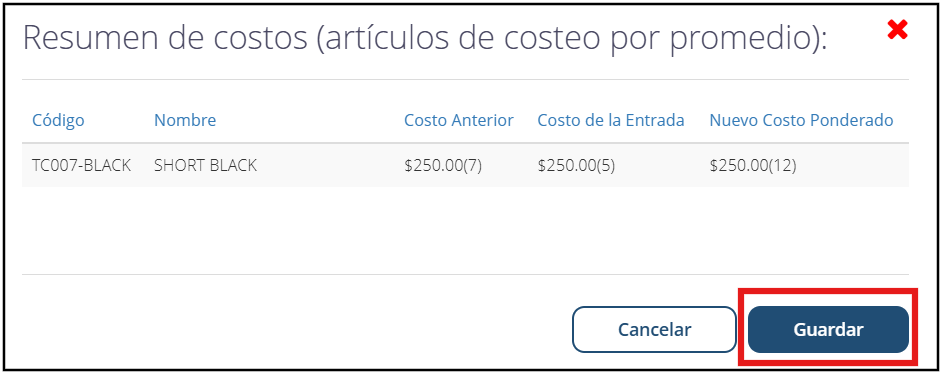
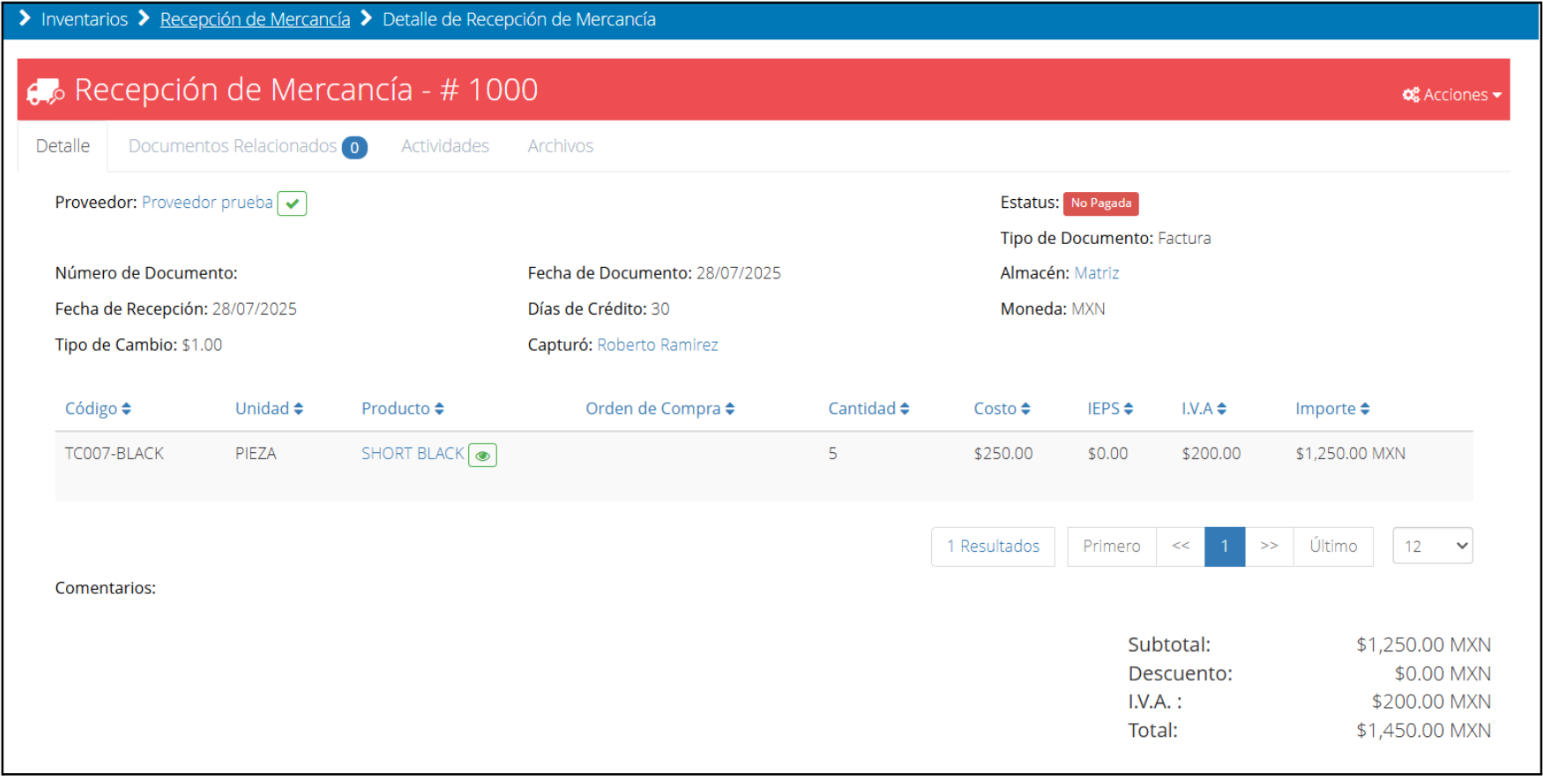
If the product is configured as an average cost, the following screen will appear. Review the data and click “Save”. It will send you to the Goods Receipt details screen.
Registration of Expenses and Non-Inventory Purchases: How to register invoices for services or general expenses.
Register Expense
On the main screen, locate the “Purchasing” module and then “Expenses”.
Once inside the expenses section, you must click on the “New” button.

Once you click on the add option, the following screen will open.
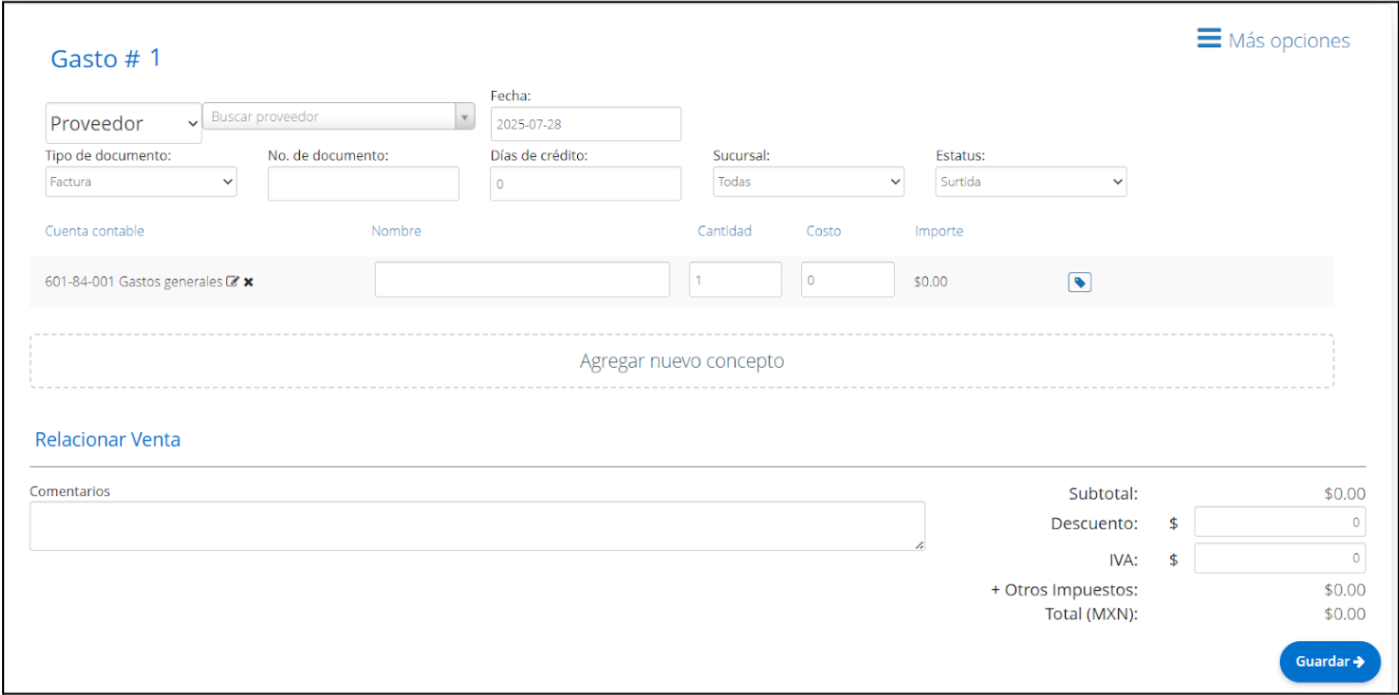
Supplier: Select an existing supplier from the list or create a new one by clicking the “New” button.
Date: Indicate the date corresponding to the invoice or document you are going to register.
Document type: Define if it is an invoice or a delivery note using the dropdown menu.
Document number: You can type the number of the document you are going to register or leave the field empty if it does not apply.
Credit days: Enter the granted credit days or let the system fill them in automatically if the supplier already has that term assigned.
Branch: Associate the expense with one of your registered branches within the system if you consider it necessary.
Status: Define if the expense is marked as approved or fulfilled; remember that only with the “fulfilled” status can you apply payments.
Accounting account: Click on the pencil icon to select the appropriate accounting account; upon selecting it, it will be marked in green and you must confirm with “Select”.
Name: Write a brief description that identifies the expense you are registering.
Quantity and cost: Enter the number of units and the unit price of the related service or expense.
You have the option to link this expense to a specific document.
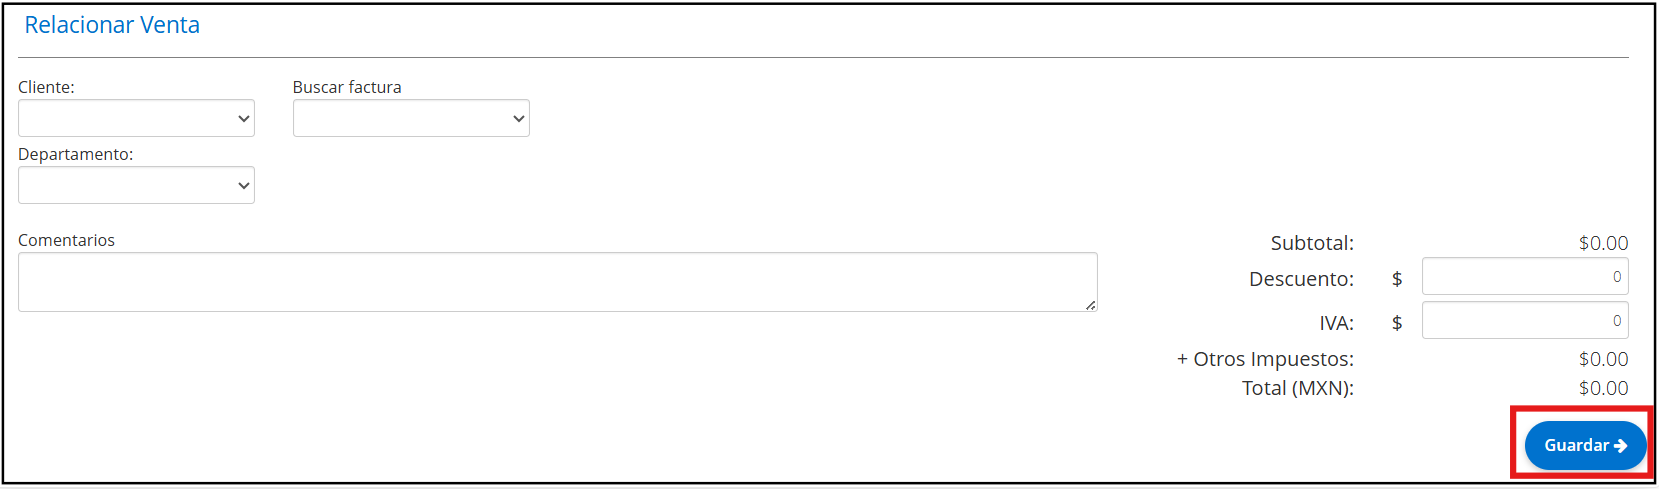
Select the customer, the invoice, and the department.
To finish, enter the discount, VAT, and other taxes (if applicable) and click the “Save” button.
Accounts Payable Management: Schedule supplier payments and apply payments to settle invoices.
Supplier Credit Note
The credit note is used to reflect partial payments made to a supplier.
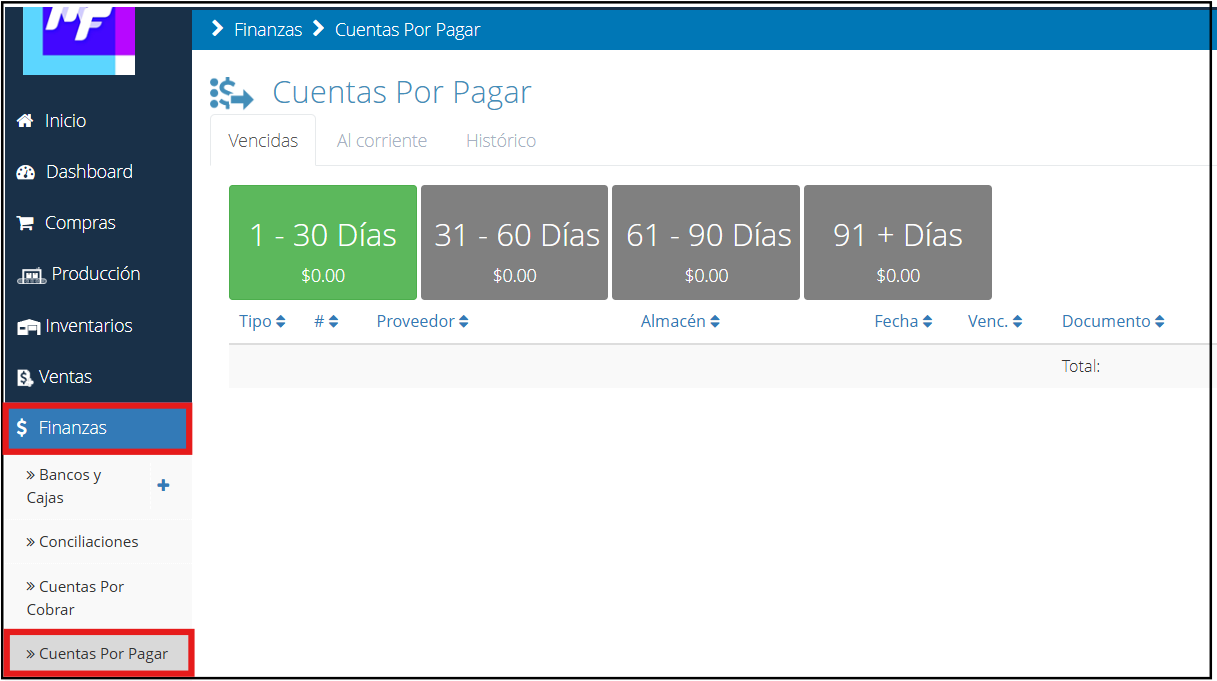
On the main screen, locate the “Finance” module and then “Accounts Payable”.

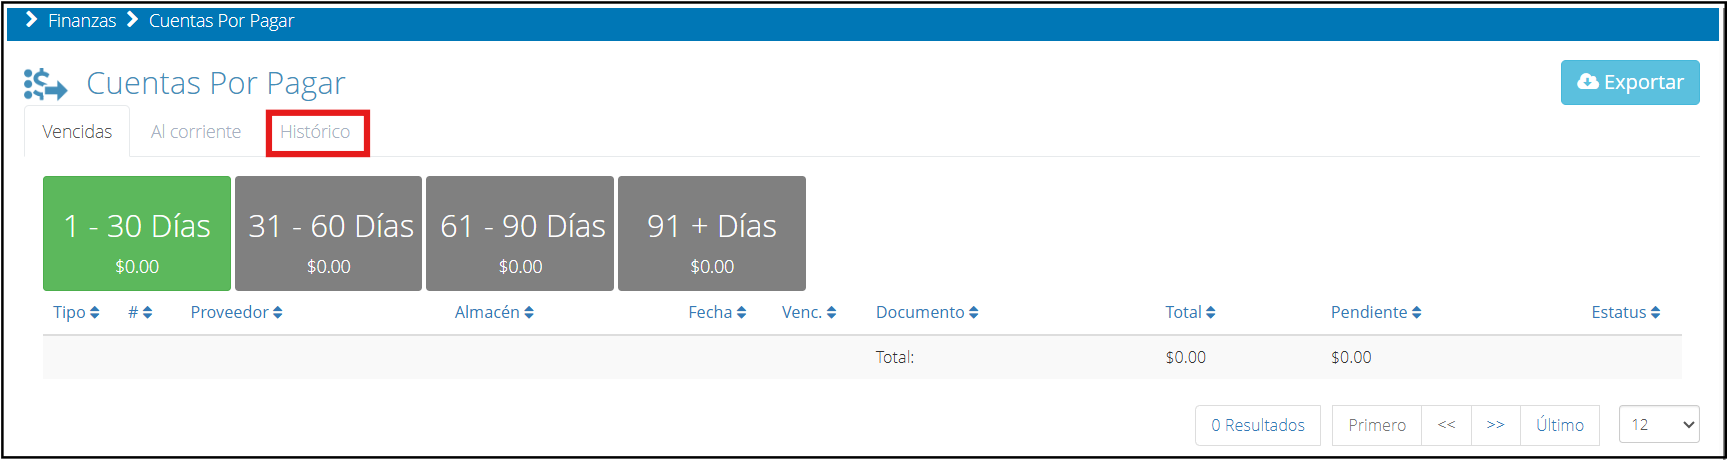
Within the accounts payable section, click on the “History” tab.
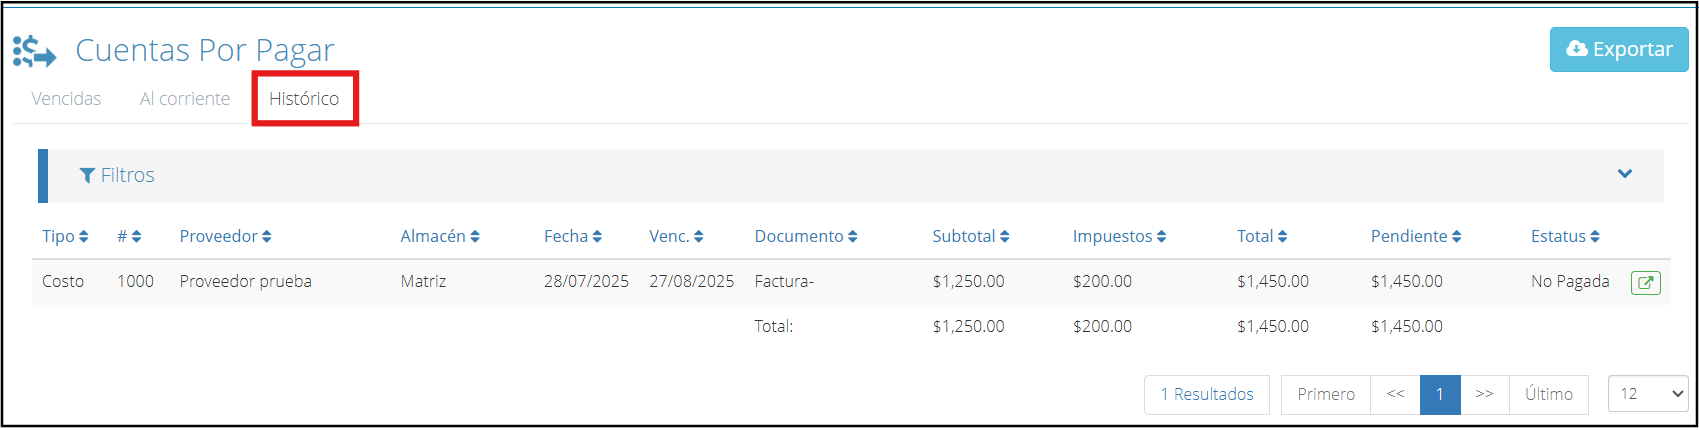
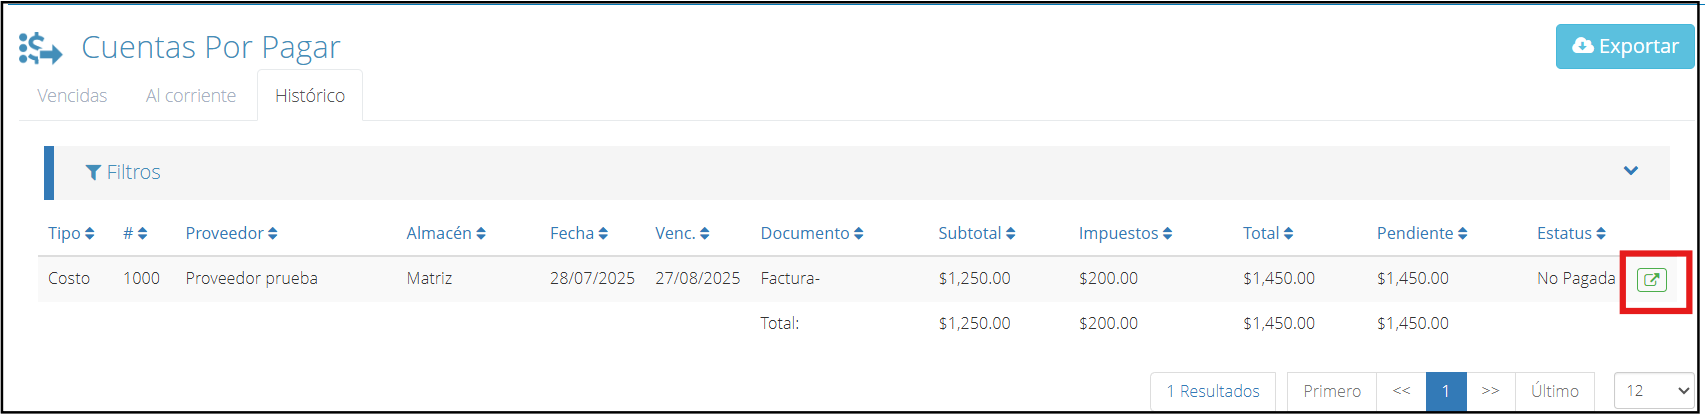
In this tab, you can view a list of the accounts that are payable. Click on the green icon to select the account.

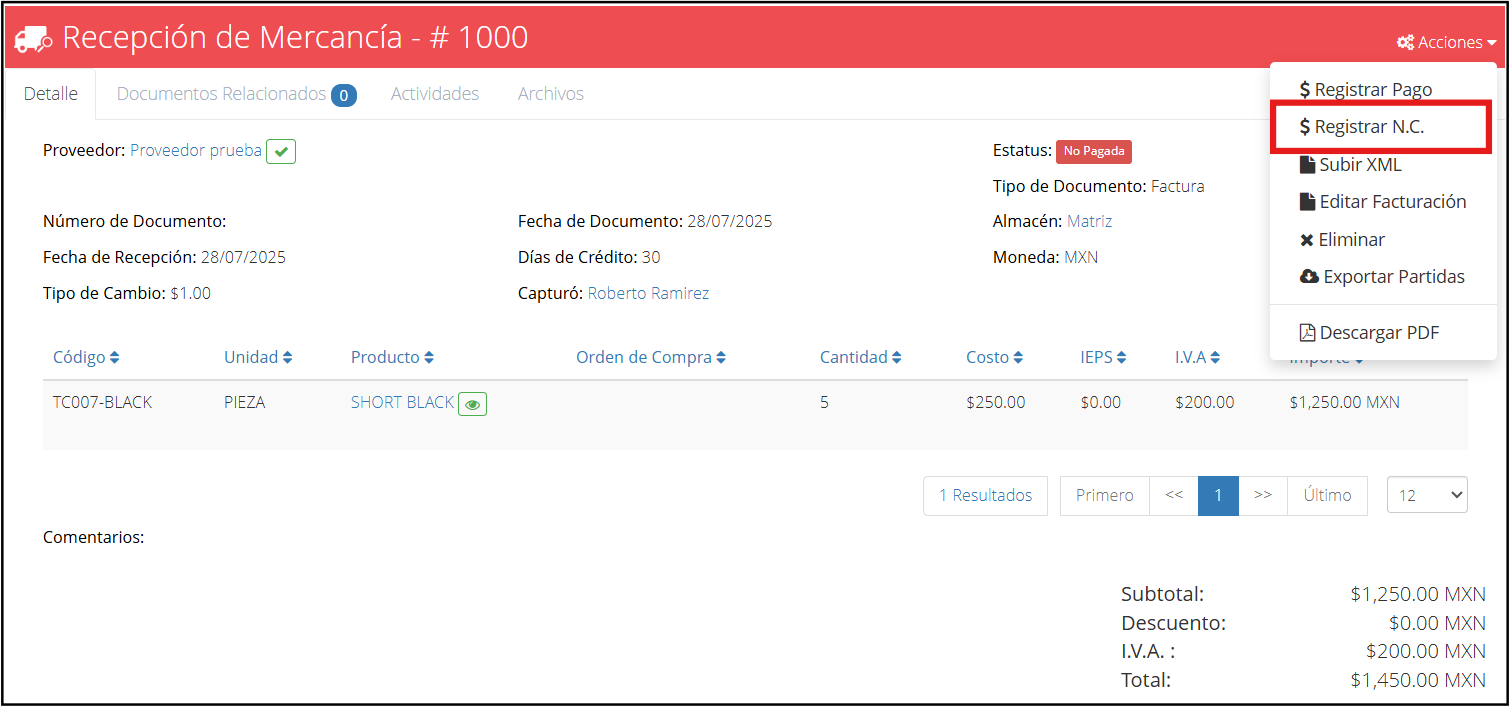
In this case, we will use a goods receipt as an example. On the screen, expand the “Actions” menu and then “$ Register C.N.”.
When you select this option, the following window will appear for capturing supplier credit notes.
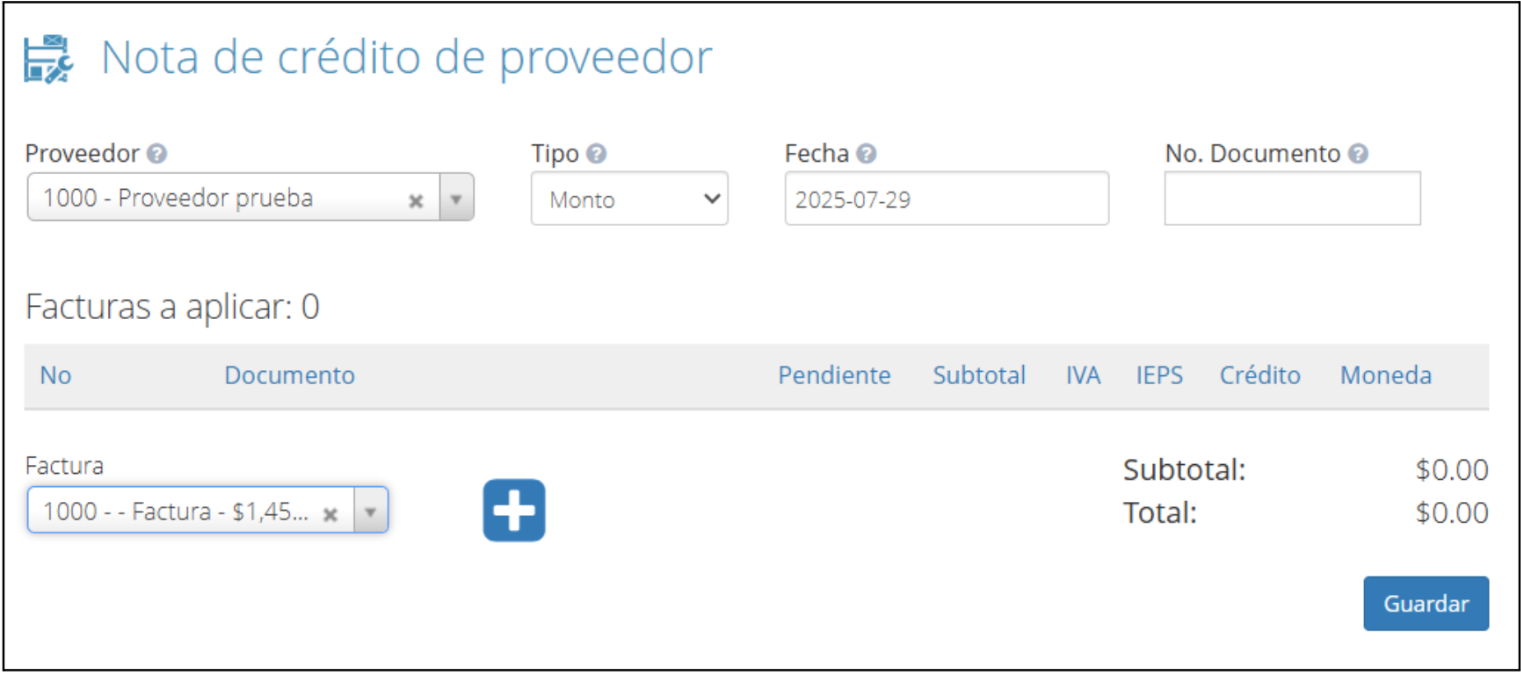
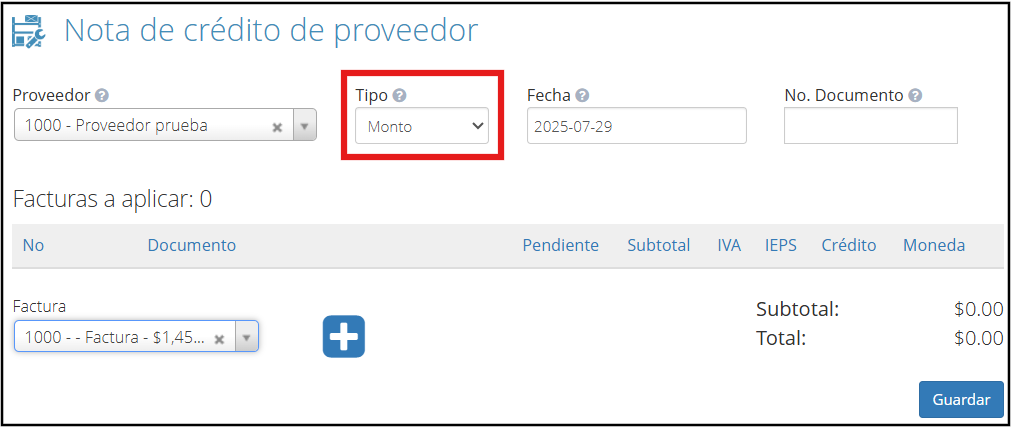
The supplier field is filled automatically. It is important that in the field named “Type” you select “Amount”.
Once this option is selected, fill in the remaining fields.
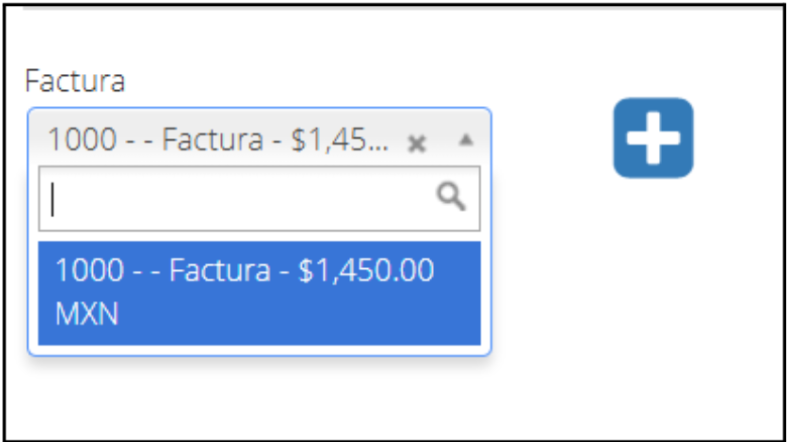
In “Invoice” select the pending (unpaid) document in the name of the supplier you selected and click the + icon to add this document during the issuance of the credit note.

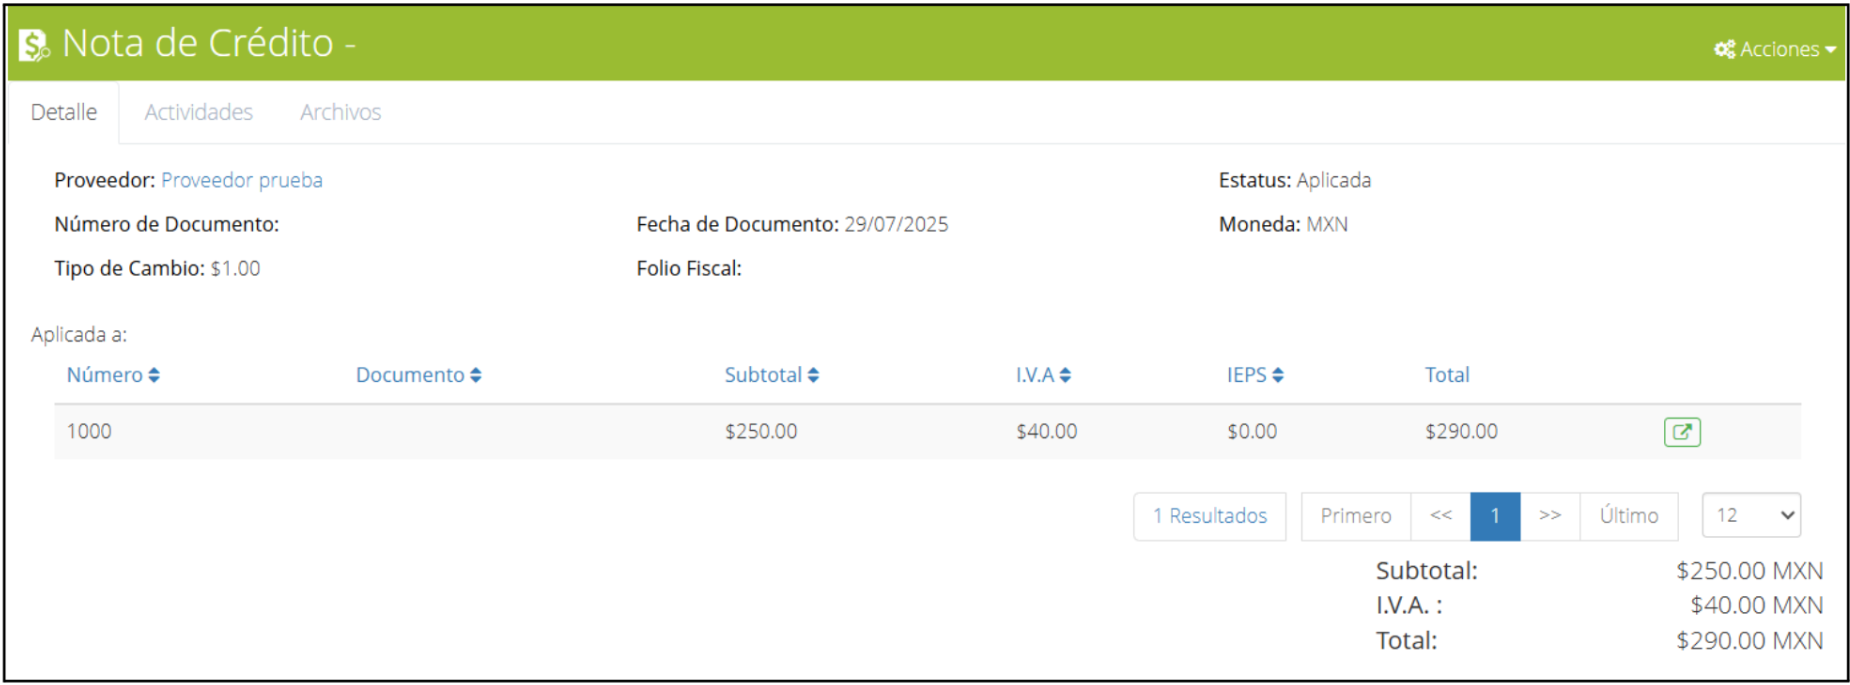
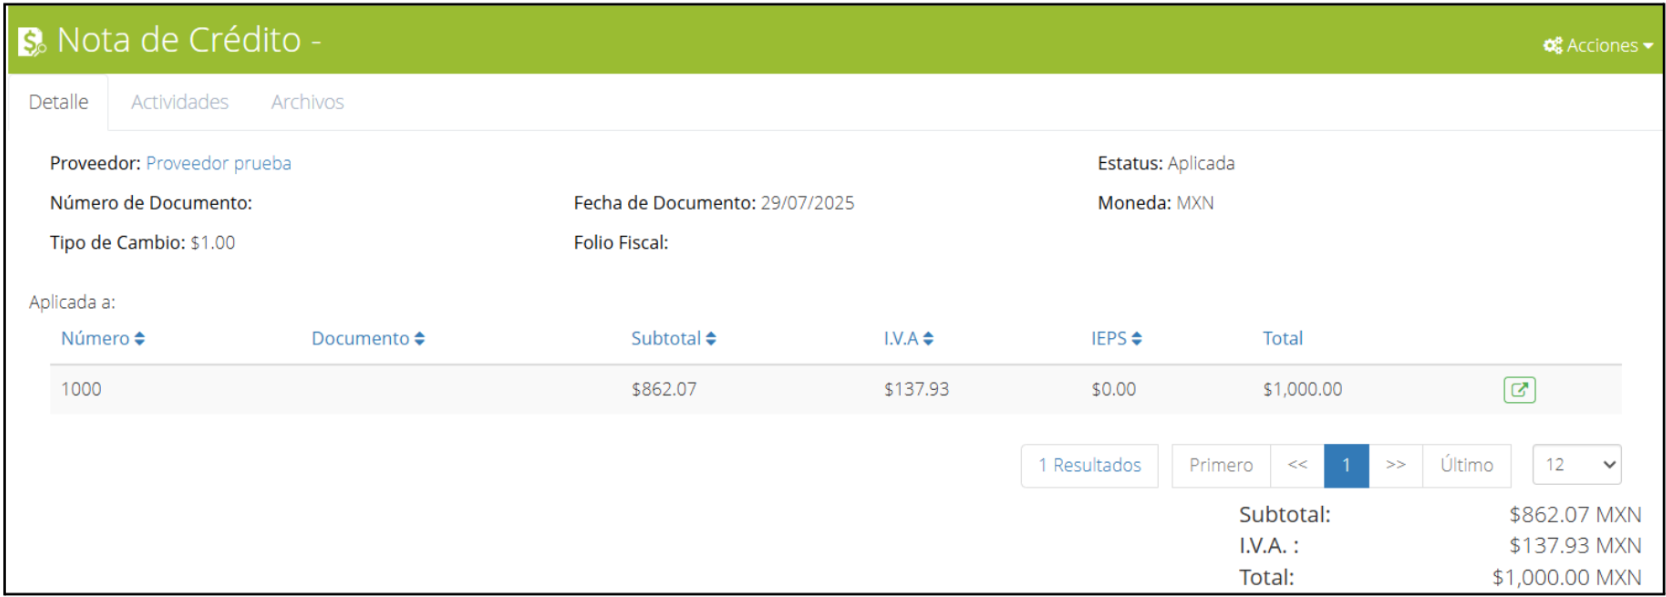
Once this option is selected, the following screen will appear, where in the field named “Credit” you must include the amount corresponding to the credit note.
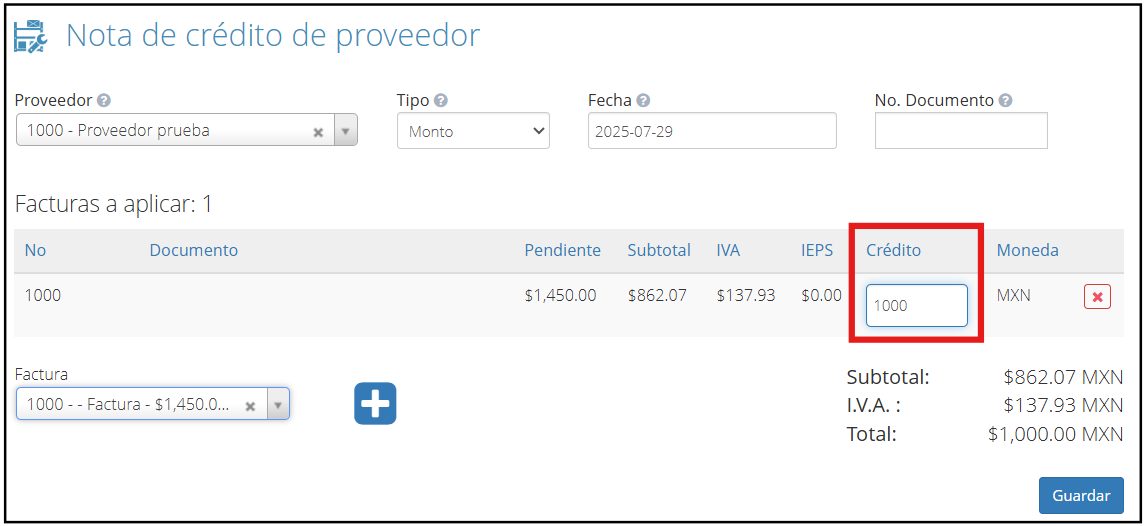
To finish, click “Save” and the credit note details tab will appear.
Supplier Returns: The correct process for returning merchandise and obtaining credit notes.
Credit Note for Return
It is used to register the return of products or services to a supplier, and with it, partially or totally cancel the previously invoiced value.
The return process is very similar to the one performed for the credit note by amount.
On the main screen, locate the “Finance” module and then “Accounts Payable”.
Within the accounts payable section, click on the “History” tab.
In this tab, you can view a list of the accounts that are payable. Click on the green icon to select the account.
In this case, we will use a goods receipt as an example. On the screen, expand the “Actions” menu and then “$ Register C.N.”.

When you select this option, the following window will appear for capturing supplier credit notes.

The supplier field is filled automatically. It is important that in the field named “Type” you select “Return”.
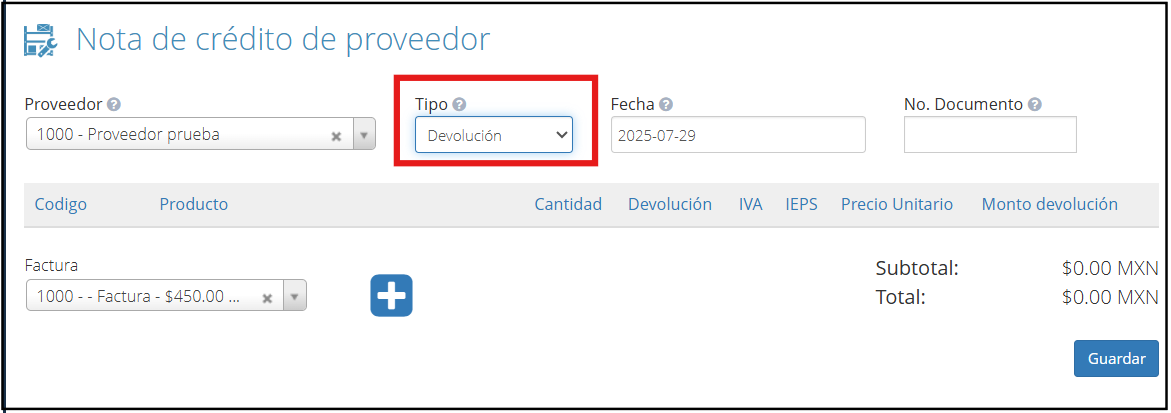
Once this option is selected, fill in the remaining fields.
In “Invoice” select the pending (unpaid) document in the name of the supplier you selected and click the icon "+" to add this document during the issuance of the credit note.
Once this option is selected, the following screen will appear, where in the field named “Return” you must enter the volume of the product that will be rejected.
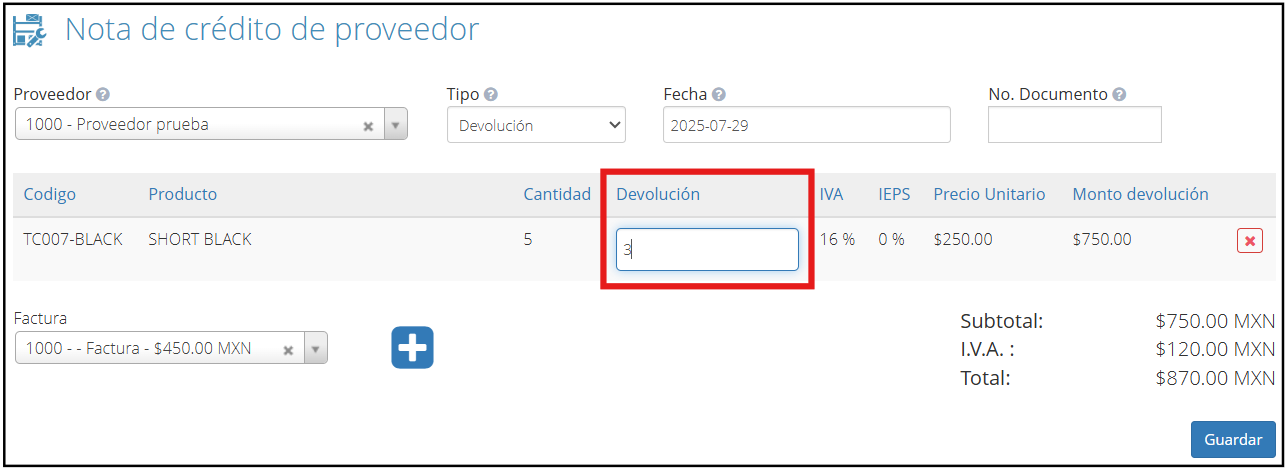
To finish, click the “Save” button.
The credit note will be issued and the following details tab will appear.